Learn Opencart 3

Opencart is an E-Commerce platform with a great focus on usability and scalability!

• Last Updated: 07/13/2020
• ( 5 minutes reading )

How to configure the LiteSpeed Cache extension in OpenCart 3

Introduction

Now that we have gone over the installation process for the OpenCart 2.3 and OpenCart 3.0 LiteSpeed Cache extension, it is time to check out the configuration options. The default settings should be completely sufficient, however, knowing your options may leave you open-minded for solutions that can give your website that extra performance boost it needs to leave your competitors behind! Let’s begin.


Getting Started

To start configuring the OpenCart LiteSpeed Cache extension, you need to install it first. If you have not done that yet, please check our tutorial on the matter. If you have, it installed already, proceed to the login form of your admin dashboard, accessible through “domain.com/admin“, where “domain.com” stands for your actual domain name.


OpenCart Admin Login Page


Please enter your login credentials into the “Username and “Password fields and press the “Login” button.


Configuration Options

Now that you have logged in, please expand the “Extensions” dropdown at the left module bar and select the “Extensions” option. Upon doing that, you will be redirected to a new page.

You will notice a dropdown menu at the end under the “Choose the extension type” label. Please expand it and select the “Modules” option from the list.


List OpenCart Modules


This will generate a table section underneath. Look for the “LiteSpeed Cache” option, and on the far right side of it, you will notice a blue pencil icon.


Access OpenCart LiteSpeed Module


Click on the pencil icon to get redirected to the Configuration settings for the LiteSpeed cache extension. These settings will be represented by three tabs - the “General” tab, the “Page Setting” tab, and the “ESI Modules”.


General Tab

The settings situated under this tab cover the general settings for the extension, such as enabling its status, ESI feature, the cache rebuild options, and cache TTL.

  • LiteSpeed Cache Status - Using this drop-down menu, you can disable/enable the cache status of the extension.
  • LiteSpeed Cache TTL (seconds) - Using this text field, you will be able to set the LiteSpeed cache TTL (in seconds).
  • LiteSpeed ESI Feature - Using this drop-down menu, you will be able to enable the ESI technology for your store.
  • Separate View for Logged-in Users - Enabling this option will generate a separate view for logged-in users. This is especially useful when you have different products/prices or promotions running for your existing users only.
  • Rebuild Cache Options - This drop-down menu gives you a variety of options regarding the manner in which your LiteSpeed Cache is rebuilt. Particularly useful if you are running a multi-lingual store.
  • Ajax Load Wishlist - This is a great option, which will allow your logged-in or logged-out users to have their wishlists cached.
  • Ajax Load Compare - This is a great option, which will allow your logged-in or logged-out users to have their compare lists cached.
  • Logging Level - This drop-down menu will enable logging for the LiteSpeed Cache extension. Useful when you are troubleshooting issues related to it.


OpenCart LiteSpeed Cache Extension General Settings


Page Settings Tab

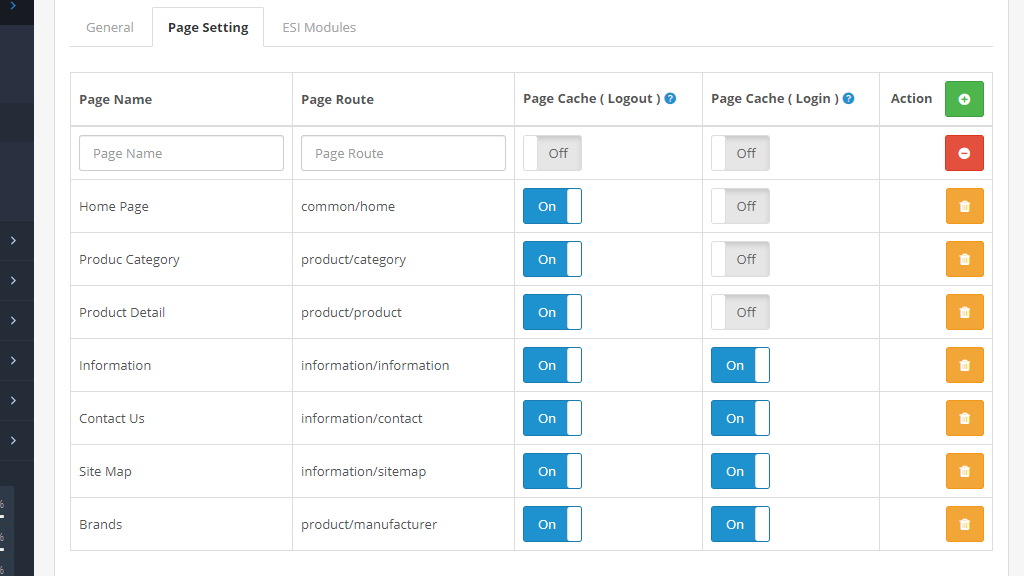
This tab contains a table section, which will give you control over cache behavior on your pages. The main OpenCart 3 pages will be added by default, and you will also have an option to add more pages and use the same configuration options for them as well.

  • Page Name - This column represents the name of the page.
  • Page Route - This column represents the route of each page.
  • Page Cache (Logout) - This column contains a toggle switch that can be turned Off or On, depending on whether you want the user to benefit from page cache on this particular page when they log out.
  • Page Cache (Login) - This column contains a toggle switch that can be turned Off or On, depending on whether you want the user to benefit from page cache on this particular page when they log in.
  • Action - On the top of this column, you will see a green plus (+) icon that will allow you to add more pages to the page settings table section. When added, each page will have a yellow garbage can icon, which will let you purge the cache for this specific page route manually.


OpenCart LiteSpeed Cache Extension Page Settings


ESI Modules Tab

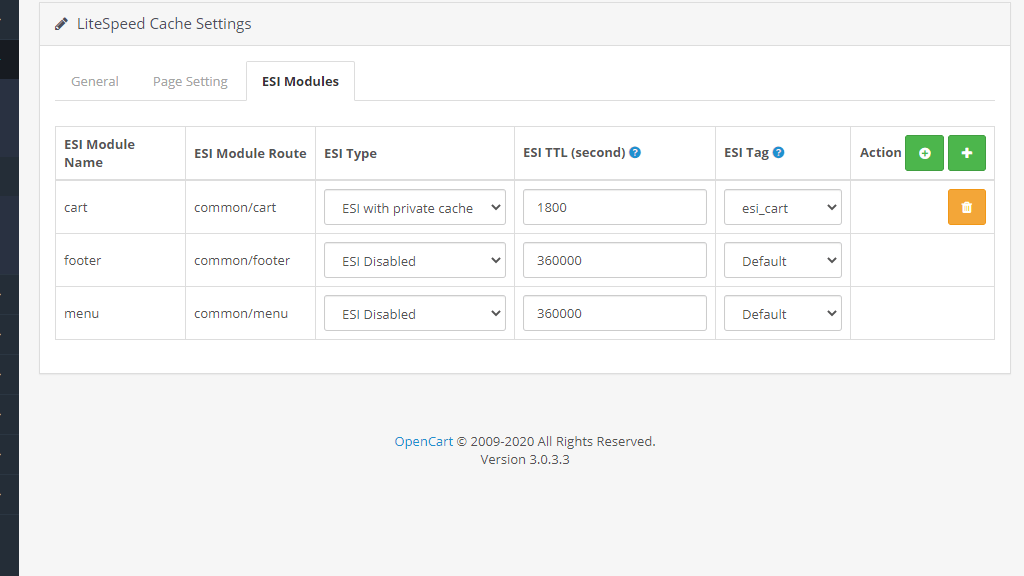
This tab is very interesting as it allows you to take advantage of the ESI technology and customize it to your liking. You will see a table section here as well and below. Let's see what each column displays:

  • ESI Module Name - This column shows the name of the ESI module you have added. 
  • ESI Module Route - Inside this column, you will see the route of the ESI module you added.
  • ESI Type - Using the drop-down menu in this column, you can set the behavior of the ESI technology of the corresponding module. You can set it to be disabled, benefit from either private or public cache, or completely ignore cache.
  • ESI TTL (seconds) - Use the text fields here to set the TTL (time-to-live) for the cache of each ESI module.
  • ESI Tag - You can select an ESI tag that will act as an event, triggering the cache purge option.
  • Action - On the top of this column, you will find two buttons. The first button will allow you to add new ESI modules by adding a new row in the table section and activating a drop-down menu under the “ESI module name” and “ESI Module Route” columns. The second button will create a new row and will give you the option to manually type in the ESI module name and route.


OpenCart LiteSpeed Cache Extension ESI Modules


There you have it! All the configuration options of the LiteSpeed Cache extension for OpenCart 2.3 and OpenCart 3.0. As we mentioned earlier, the default settings are more than enough to boost the performance of your website. However, if you are really committed, and you like to play around with new stuff - then this tutorial should get you started!


...
Sebahat
Content Marketing Specialist

Sebahat is a young and bright woman who has become an invaluable part of our team. She started as a Customer Care Representative, mastering that role and, along the way, growing into a tech-savvy individual who is well acquainted with every support layer of the company. Driven by her aim to improve our customers’ experience constantly, she is committed to enhancing the extraordinary support we deliver.

Learn more about Opencart 3 in the other tutorials that we have: