
phpMyAdmin is a vast tool providing many functionalities for database management. One of these features is the Export database utility. In this tutorial, we will review the process of exporting single and all databases. As well as how to exclude unnecessary database tables during this process. Afterward, we will go over the two export types phpMyAdmin provides - Quick and Custom. Let’s get started!
Before you can access the phpMyAdmin functionality, you need to log into your cPanel account with us. To do so, please check our tutorial on how to access the cPanel service.
Once logged in, please navigate to the “Database” section and click on the “phpMyAdmin” icon.

Clicking on the result will redirect you to the “phpMyAdmin” feature, allowing you to start managing your database.
To export a database on your account, you need to access the “Export” tab. To access it, please select a database from the list located in the left panel of the screen. This sends you to the individual database page, and from the tab bar on the top, you have to access the “Export” tab.

Once you have been redirected to the “Export” page, you can see the “Export method” section.
Under the “Export method” section, you can see the two available options - Custom and Quick. Let us go over both so you can be able to choose the best one for your case.
The “Quick“ export method is pretty straightforward. To select it, please use the radio button located under the “Export method” section.
It only gives you the option of choosing the format of the exported database file. This may be done via the dropdown menu under the “Format” section.

Once the format has been chosen, please click the “Go” button located beneath the dropdown menu.

This starts a download process and saves the exported file format on your local computer.
To select the “Custom” export method, please use the radio button under the “Export method” section. Selecting it expands a couple of sections underneath, allowing you to customize the export process.
Format section
This is analogic to the “Quick” method. It allows you to choose the format in which the database to be exported.
Tables section
The “Tables” section allows you to choose which tables to export. It has a content box underneath it, containing all the tables of the selected database. On the right side, you can see tick boxes, which allow you to choose if you want to export the database’s structure, its data, or both.

On the left side, you can find another tickbox, allowing you to select/unselect a specific table by ticking/unticking the box.
Output section
The “Output” section allows you to customize the data that is being exported. Let’s go over all the options there.
Format-Specific options section
Using the settings under this section, you are able to format the file that is going to be export. Here they are:
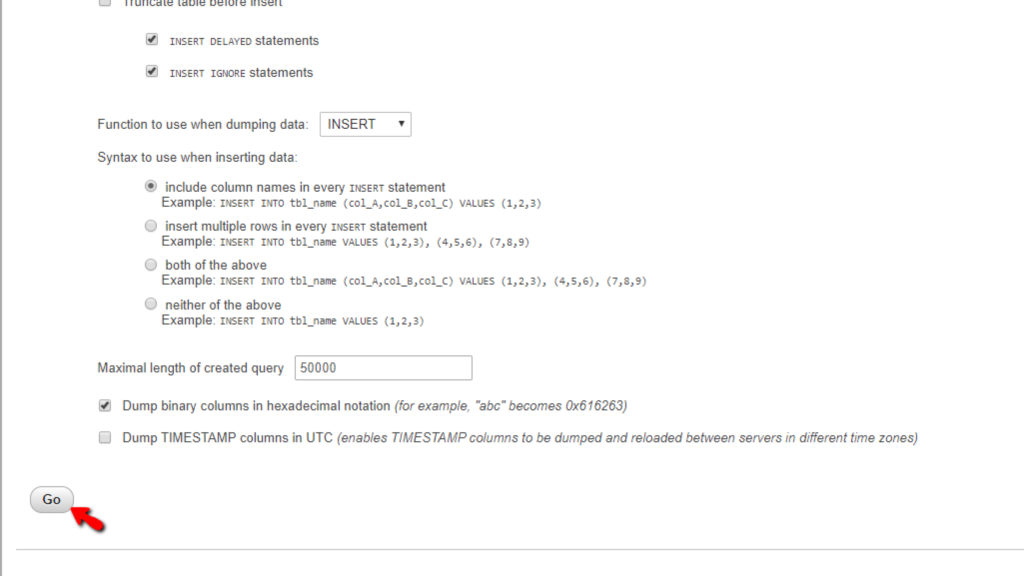
Object & data creation options
The settings under this section help you customized the statements that added during the export process.
After all of the settings have been adjusted, please press the “Go” button located at the bottom left side of the page.
This starts a download process and saves the exported file format on your local computer.
The process is absolutely analogical to the above with a few minor exceptions. When you are redirected to the phpMyAdmin page from cPanel, instead of selecting a database from the list on the left side of the page, simply point your attention to the tab bar on the current page. You can see the “Export” tab located near the “Status” tab. Please click on it.
When you are redirected to the “Export” page, and you select the “Custom” method, instead of seeing the “Tables” section, you can now see the “Databases” section, allowing you to choose which databases you want to export.
By default, all of them are selected, but you can click on a database to choose it for an individual export. You know that you have chosen it, as it is highlighted in blue. You may also use the “Select all” and “Unselect all” buttons in this section to select and respectively unselect all databases in the content box.

And there you have it! Both methods of exporting your database using the phpMyAdmin feature of the cPanel. We hope that after reading this tutorial you have the necessary knowledge to fully utilize this functionality. If you notice any technical issues during this process, please be sure to contact our Technical Team. They are 24/7 available via the ticketing system in your Client Area.

Nikola is an accomplished tech-savvy extraordinaire with over six years of experience in the web hosting field. He started as a customer care representative and quickly rose the ranks to become a support supervisor and, eventually - the head of the technical department in HostArmada. His deep understanding of the client's needs, combined with his technical knowledge, makes him the perfect man to create the ideal harmony between client satisfaction and professional problem-solving. You will often find him creating helpful tutorials, articles, and blog posts that help existing customers get around.
Learn more about cPanel in the other tutorials that we have:
