
In this tutorial, we will guide you on how to manually install OpenCart 3 on your web hosting account. We will carefully review all installation steps and explain everything in detail. At the end of this guide, you will not only have an Online Store empowered by OpenCart but you will be familiar with the basic concept of installing web applications manually.
To begin with the installation, you will first need to download the required installation files from OpenCart’s official website which you can directly access from here.

Please click on the “Download Now” button to initiate the process and allow it a few moments to be successfully completed.
Now that you have the installation files downloaded on your local computer it is time to upload them to your web hosting account. In the following lines, we will specifically review how to directly upload the archive file through the cPanel “File Manager” and via File Zila. However, the files can be transferred by using any FTP Client or File Manager tool, therefore, please feel free to proceed in the most convenient way for you.
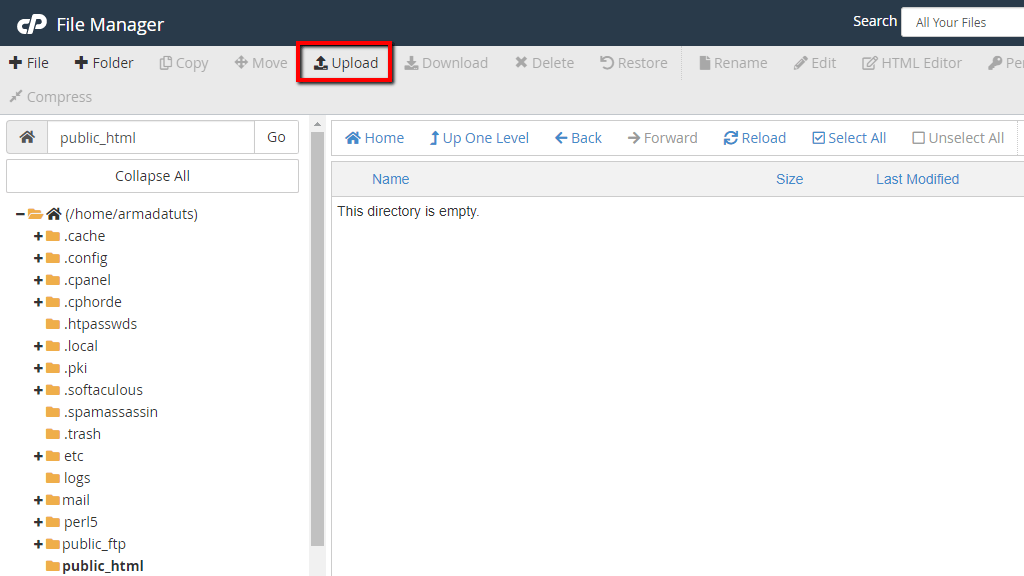
In order to upload the archive file, please log in to your cPanel account and click on the “File Manager” icon available under the “Files” section. You will need to navigate to the folder where you would like OpenCart to be installed. The root directory of your primary domain name is the “public_html” folder. If you want the application to be installed directly on it (i.e. https://yourdomain.com), please make sure to be located under it. Alternatively, if you want to install the application in a subdirectory, subdomain or addon domain, ensure you are in the appropriate folder.
Afterward, please click on the “Upload” button, then select the zip file from your local computer and allow it a few moments to be successfully uploaded.
Once the zip file is uploaded, please right-click on it, select the “Extract” option and wait for a moment the process to be completed.

Please note that all the files are located in the “upload” folder and you will need to move them directly into the root folder. In order to do that, please access the “upload” folder, select all files and click on “Move”.

You will be prompted with a new pop-up window where you will need to specify the path to the folder where the files need to be moved, in our case /public_html/ and click on the “Move File(s)” button to confirm.
If everything was done properly you will be able to see all files listed in the root directory where the installation will take place. Now you can safely delete the archive file and the “upload” folder as they are no longer needed.
In order to upload the files via an FTP client, you will need to first extract the archive file on your local computer. We would recommend you to create a new folder where you can extract the files in order to keep everything organized. When the archive is extracted, please access the “upload” folder and move all the files available under it directly into the newly created folder.
Once you are ready, please connect your FTP client to your web hosting account.
From the file structure on your right, please select the root folder where you desire OpenCart to be installed. From the folders of your local computer (left side), please navigate to the folder where you have extracted the Opencart files. Once you locate the folder right-click on it and choose the “Upload” option.

After the upload process is successfully initiated, please allow it with a few moments in order to successfully finish. Once the process is completed you are all set to continue to the next step.
The next thing you will need to do is to create a new database. This can be easily done via the “MySQL Database Wizard” tool available in cPanel. Once you are logged into your cPanel account, please navigate to the “Database” section and click on the “MySQL Database Wizard” icon.

In the first step, you will be required to define the name of the database. Please note that the name can contain only letters and numbers.

Once you are ready, please click on the “Next Step” button.
In the second step, you will need to create the Database user. Please enter your database username and password in the corresponding fields and make sure to keep the credentials on file as you will need them later while you are setting up OpenCart.

Once you are ready, please click on the “Create User” button.
In the third step, you will need to determine the privileges granted to the user. Please make sure to select “All Privileges” by clicking the checkbox at the top.

Once you are ready, please click on the “Next Step” button in order to finalize the creation of the database.
You are all set now and you are ready to step into installing and configuring of OpenCart.
The final step you will need to take in order to proceed with the installation is to access your store’s web address (i.e. https://yourdomain.com) from your Web browser. You will need to follow OpenCart’s installation guide and within four simple steps, your Online Store will be up and running.
In the first step, you will be required to agree with OpenCart’s terms. Please take a moment to read them thoroughly and once you are ready, click on the “Continue” button.

In the second step, a check of your hosting account environment will be initiated to confirm its compatibility with OpenCart’s requirements.
The “Status” column will show if the requirements of the given parameters are fulfilled. In case you end up with error messages as shown in the below screenshot example you will need to make the required changes.

When you download OpenCart’s installation files the “config.php” files are by default named “config-dist.php”. What you need to do is to rename both of the files - one of them is located in the root directory and the other one is under the “admin” folder. Also, you need to ensure they are set up with the correct 644 permissions.
Once you perform the changes, please refresh the page and double-check if you get the green checkmark for all parameters. If you have managed to achieve it, you are ready to click on the “Continue” button.
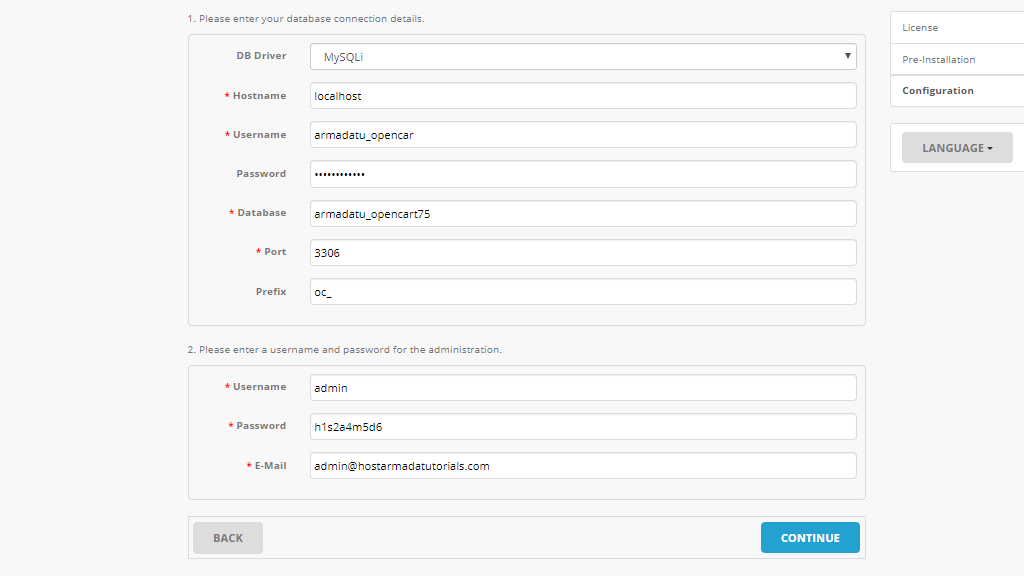
In the third step, you will need to enter your database details and select the login credentials for your OpenCart Admin Dashboard. Please, enter the database name, username, and password and leave the rest of the settings as they are. In the next section, please enter your admin username, password, and email.
Once you are ready, please click on the “Continue” button.
In the last, fourth page, you will be presented with the “Installation complete” page and you will be prompted to delete the “installation” folder from your OpenCart directory. This is something you certainly would want to do - there is no use of the folder any longer and you will avoid seeing this message popping up all the time.

And this is it! You are all ready to start developing your brand new OpenCart Online Store. We would like to sincerely wish you good luck with your project and thank you for trusting our guidance. If at any point you have experienced any difficulties, please do not hesitate to contact our Support Team for further instructions or troubleshooting.

Sebahat is a young and bright woman who has become an invaluable part of our team. She started as a Customer Care Representative, mastering that role and, along the way, growing into a tech-savvy individual who is well acquainted with every support layer of the company. Driven by her aim to improve our customers’ experience constantly, she is committed to enhancing the extraordinary support we deliver.
Learn more about Opencart 3 in the other tutorials that we have:
