
The abbreviation "DNS" stands for Domain Name System and it is used to translate domain names into IP addresses so any pair of computer systems can communicate with each other.
The DNS Zone of a domain name contains small pieces of information known as DNS records used to provide information to the DNS service in order to show a website, send or receive an email, etc.
The DNS Zone of a domain name is just a small plain text file stored on the Web Hosting Server where your domain name is being pointed to by its nameservers. It is managed by a specific organization - typically a Web Hosting Company like HostArmada.
When a domain is being used to access a website your web browser submits a query towards the DNS zone of the accessed domain using your local DNS service. This query should be then answered by the Web Hosting Server where that DNS zone is being stored with a DNS record providing the correct IP address of the accessed website. With that piece of information, your web browser knows where to send the web requests and the cycle of communication begins until the website is finally rendered.
Typically when a cPanel account is created, WHM will automatically create the DNS zone for its primary domain. However, there are cases when you might want to add a DNS zone for a domain without actually associating the domain with an existing cPanel account. In such cases, you will be unable to manage a website for that domain name and WHM will display a default page when the added domain is being accessed.
In this guide, we will be looking over the “Add a DNS Zone” feature that allows you to add DNS zones to your server from the WHM control panel.
As with all other WHM control panel features you need to first log into the WHM service for your VPS or Dedicated Server. If you are not sure how to do that, please check our How to Access WHM tutorial. After you have logged in, please use the search field on the left side of the page and type “Add a DNS Zone”.
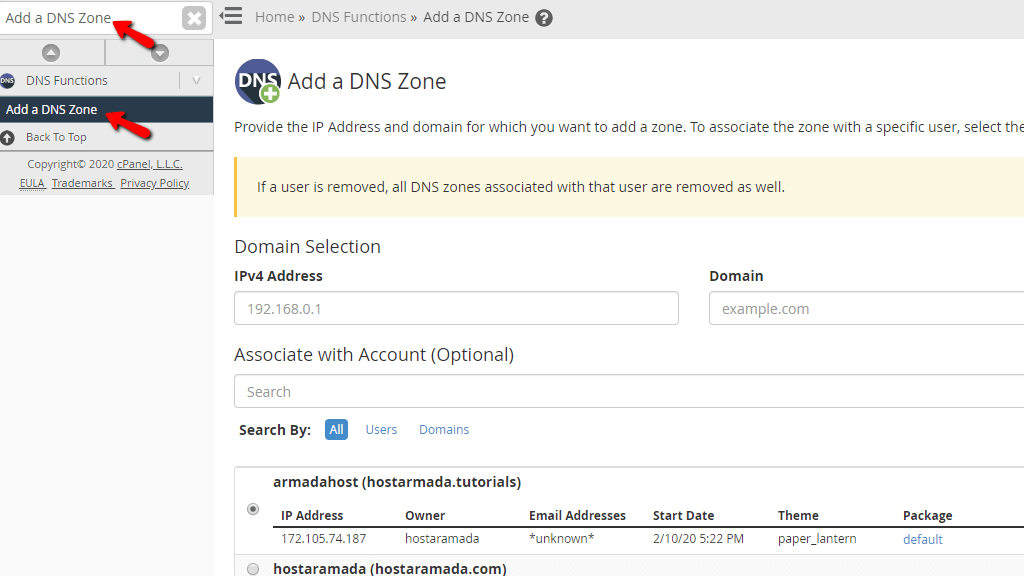
When the single result presents itself below the search bar, click on the “Add a DNS Zone” link in order to be redirected to the desired page.
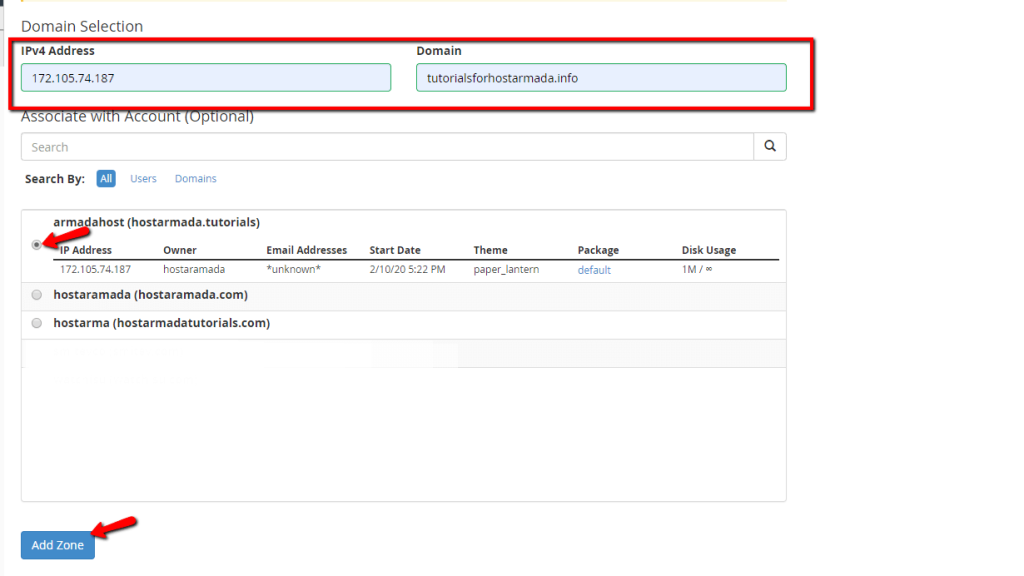
On the “Add a DNS Zone” page, you will notice the “Domain Selection” heading and underneath, two fields - an IP address field and a Domain name field.

In the “IPv4 Address” field, please type the IP address where you want the domain to resolve to. In the second one, please type the desired domain name. Please note that you need to own this domain and it needs to be pointed to your server’s nameserver with us in order for the domain to be able to resolve to the configured IP address. Also, the IP address you are configuring needs to be the actual IP address of your VPS or Dedicated Server with us.
Below these two fields, you will find a search bar that can be used to filter accounts on the server and associate the DNS Zone you are adding with a selected cPanel account. This is completely optional, as you can add the DNS zone on the server without choosing an account. When you are have filled in the IP address and domain name, please press the “Add Zone” button located at the bottom of the page.

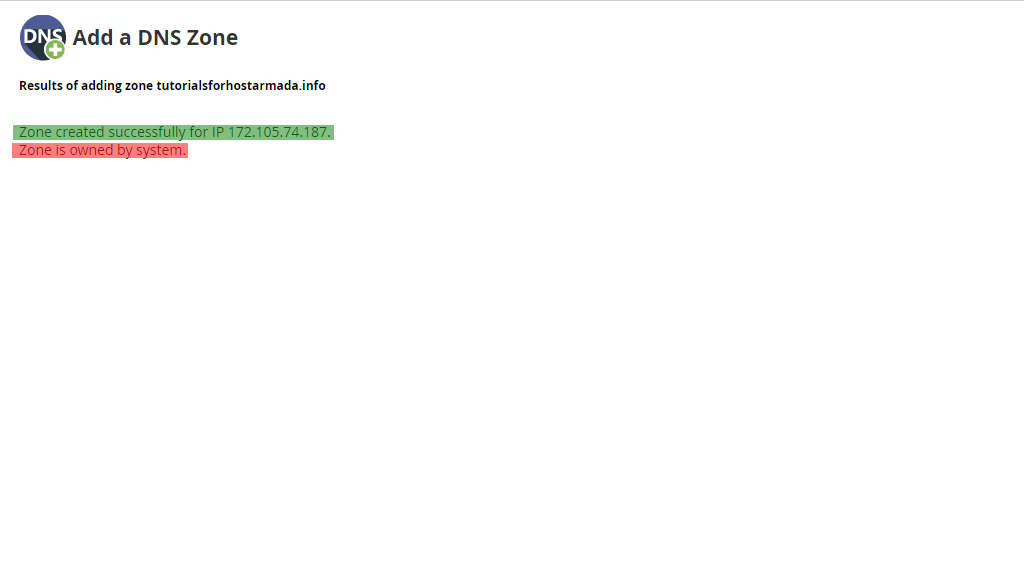
Note that this way, the DNS zone will be owned by the system and this zone will be invisible from any of the cPanel accounts hosted on the same server. Also, this DNS zone may only be edited through the WHM control panel.
If you want to add this DNS Zone under a specific account, then what you need to do is enter the required information in the aforementioned fields and then use the radio button to select an existing cPanel account. Finally, press the “Add Zone” button at the bottom of the screen.
WHM will then add the zone to your server and will present you with the result of the process.

As you can see, the difference here is that when you add it under a specific account - the user will now own this DNS zone and they will be able to edit it from their cPanel account.
Here you go! Everything you need to know about the “Add a DNS Zone” feature neatly packed under this guide. Hopefully, the guide was informative enough and you are now able to manage this without any issues. Should you need any assistance, please, feel free to contact our Technical Team from your Client Area by submitting a ticket.

Sebahat is a young and bright woman who has become an invaluable part of our team. She started as a Customer Care Representative, mastering that role and, along the way, growing into a tech-savvy individual who is well acquainted with every support layer of the company. Driven by her aim to improve our customers’ experience constantly, she is committed to enhancing the extraordinary support we deliver.
Learn more about WHM in the other tutorials that we have: