
In this tutorial, we will introduce another method for installing Joomla. We will step-by-step guide you on how to manually install the Joomla CMS which comes really handy when you cannot do so via the Softaculous Auto Installer for some reason. At the end of this guide, you will not only have a website empowered by Joomla but you will be familiar with the basic concept of installing web applications manually.
First thing first, you will need to download the required installation files from the official Joomla website. Once you access the page, all you will need to do is click on the “Download Joomla! x.x.x” button (where “x.x.x” represents the latest stable version).

When the download process is initiated, please allow it the necessary time to be successfully completed. As soon as you have the archive file downloaded on your local computer you are ready to jump into the next step.
Now it is time to upload the installation files to your web hosting account. There are two methods you can follow in order to complete this task and they are both quite simple.
An important note to make. When you are uploading/extracting the files, please pay attention to the directory under which you are located. If you want Joomla to be installed directly onto your domain name (i.e. https://yourdomain.com) make sure to upload the files to the root folder (public_html for your primary domain name). Alternatively, if you wish Joomla to be installed on a subfolder (e.g. https://yourdomain.com/blog) you will need to ensure the subfolder is created and the files are uploaded in it.
The first method is to directly upload and extract the archive file using the “File Manager” tool integrated into your cPanel account. You can find step-by-step instructions on how to upload and extract files in our guide based on How to manage the files of your hosting account using the File Manager feature. For your convenience we have included direct links to each of the sections:
The second method is to extract the archive file on your local computer and upload the files to your web hosting account using your favorite FTP Client. In our tutorials based on FTP Services, you will find detailed instructions on how to upload files using various FTP Clients.
Joomla, like most CMSs, requires a database to function properly and to store your website data. Therefore you will need to create a new one that will be assigned to it. That can be done within a few clicks via the “MySQL Database Wizard” tool integrated into your cPanel account. You will find step-by-step instructions in our guide based on How to create MySQL Database via cPanel.
While you are creating the database, please make sure to keep the database name, username, and password on file as you will need them later on while setting up the application.
Once your new database is created you will be finally ready to step into setting up Joomla.
After all the hard work you are finally on the finishing line. Please open your favorite web browser and enter the domain name under which you aim to install the application (e.g. https://yourdomain.com). This action will launch the installation guide and within three simple steps, you will have your brand new website up and running.
First, you will be presented with the “Configuration” page. We will review and explain each of the settings individually.

For a start, you will need to select the default language for your Joomla website and Administrative area from the dropdown menu.
Then you will need to specify the following website details:
Please note that the above settings can be edited anytime in the future.
Afterward, you will need to set your Joomla Admin User details:
Whenever you are ready, click on the “Next” button.
On the second “Database” step you will need to configure the database details.

Please enter the database name, username, and password in the corresponding fields. The “Database Type” field determines the relational database driver type. For HostArmada customers, please make sure to leave it set to “MySQLi”. Leave the “Host Name” field set to “localhost” unless the database in question is stored on a remote server. The “Table prefix” field is optional, so you can leave it as it is. The “Old Database Process” setting determines whether existing tables from previous Joomla installations will be backed up or replaced.
When you are ready, please click on the “Next” button.
The last “Overview” step contains a summary of all your Joomla configuration details. You will also be provided with a few options to import sample data if required.

Below on the same page, you will see the Pre-Installation test results and recommendations for setting configurations.

Whenever you are ready, please click on the “Install” button to initiate the process.
On the last page, you will be presented with “Joomla! is successful installed” message and you will be advised to delete the “installation” folder from your Joomla directory. This is something you certainly would want to do - there is no use of the folder any longer and you will avoid seeing this message popping up all the time.
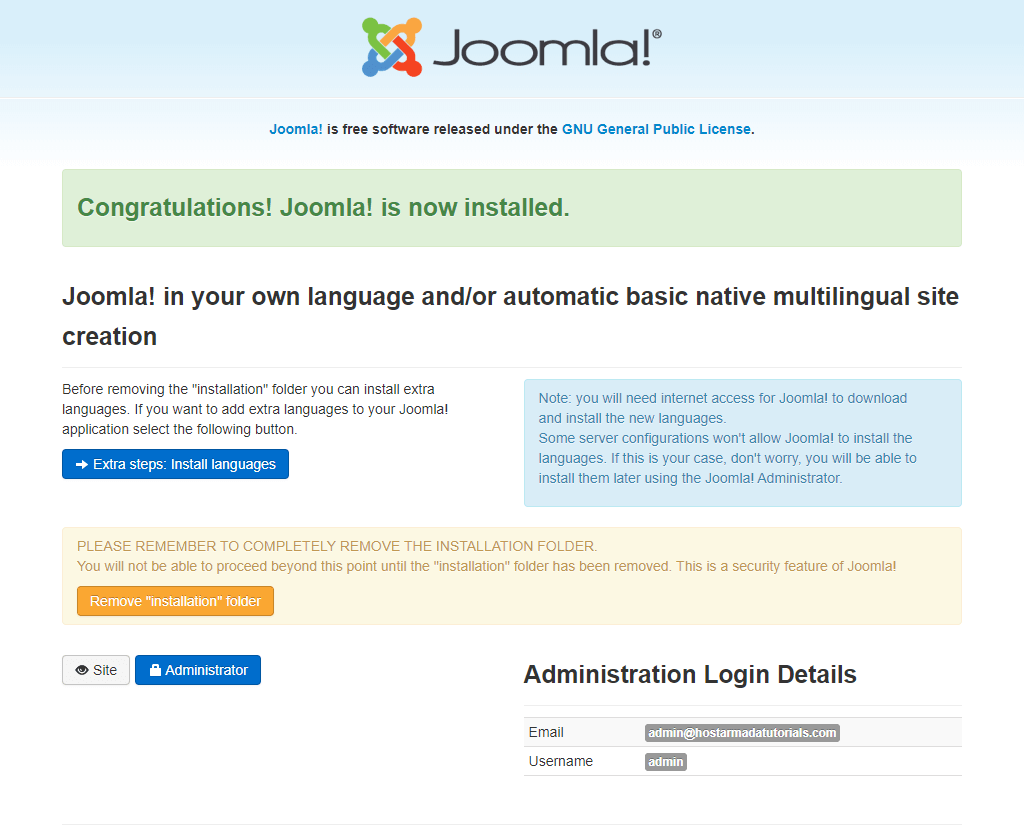
That is it! You have now successfully installed Joomla and you are ready to start working on your brand new website. We would like to thank you for trusting our guidance and welcome you to contact our Support Team in case you have any further questions.

Sebahat is a young and bright woman who has become an invaluable part of our team. She started as a Customer Care Representative, mastering that role and, along the way, growing into a tech-savvy individual who is well acquainted with every support layer of the company. Driven by her aim to improve our customers’ experience constantly, she is committed to enhancing the extraordinary support we deliver.
Learn more about Joomla in the other tutorials that we have: