
Learn Wordpress
Considering the fact that easy navigation is one of the most important aspects of a website, you should carefully organize your site menus. We are all aware of how frustrating it could get if you spend a long time trying to find your way through a website. It could reflect on potential users lost, and no one wants that.
In WordPress, menus are collections of order links that can be assigned to any menu position available in the theme you are using. Each menu consists of a set that holds specific items. The fact that menus could be displayed on any page and in any form gives you great flexibility.
In this tutorial, we are going to guide you on how to manage and organize your menus effectively.
For a start, we will need you to log into your WordPress Admin Dashboard. You can do that by accessing your domain followed by "/wp-admin", i.e., "yourdomain.com/wp-admin", where "yourdomain.com" stands for your actual domain name.
Once logged, please navigate through the left-hand side menu bar to Appearance > Menus.

Once this is done, you will be redirected to the "Menus" section, where the creation and management of all your WordPress menus will take place.
Now that you are on the intended page let's start with the fundamental step of creating your very first custom menu. To do that, please click on the "create a new menu" link.

When the link is clicked, you will be presented with a single empty "Manu Name" field where you need to enter the menu title. Once ready, please click on the "Create Menu" button.

Upon doing that, the new menu will be successfully created and ready for further configuration. As you can see, it is pre-selected for edition, therefore you can start customizing it right away.
As the menu is now created, it is time to add the desired menu items to it. Within the panel on the left, you will find all menu items currently available on your WordPress website - pages, posts, custom links, and categories.
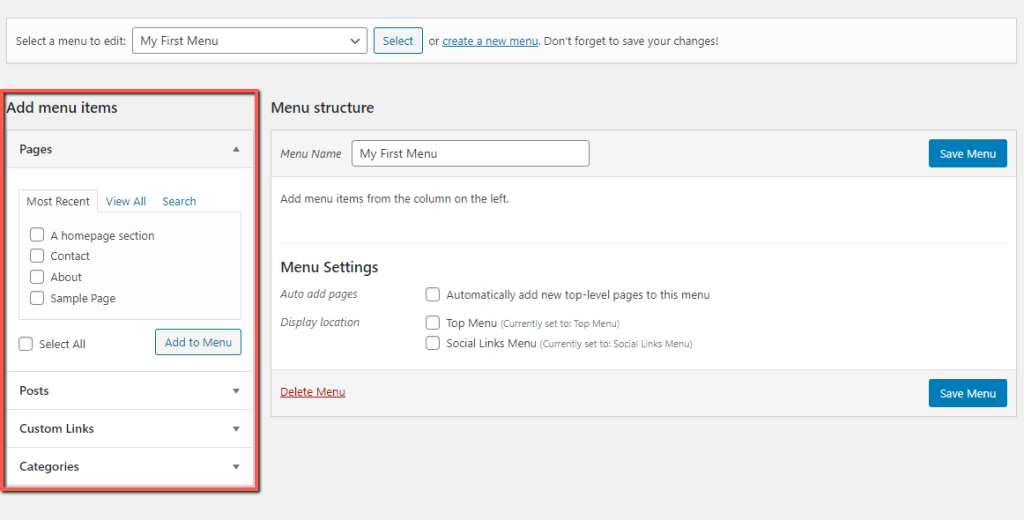
As you can see, each menu item category is represented as a separate dropdown menu, which you may expand by clicking on the corresponding arrow icon. The pages, posts, and categories are divided into three "Most Recent", "View All", and "Search" subsections for easy navigation.
The process of adding particular menu item(s) is simple enough. You need to tick the corresponding checkboxes and then to hit the "Add to Menu" button.
In case you want to add all listed menu items, you have to tick the "Select All" checkbox to mark them.

Once you click on the "Add to Menu" button, the menu items you have chosen will be instantly added to the menu editor (right panel).
Within the "Custom Links" dropdown, you are able to configure an absolute URL address, which will lead to an internal or external page. When the section is expanded, you have to insert the URL address and the link name, which will represent the item in the menu.
Once you are ready, please click on the "Add to Menu" button.

Now that you know how to add items to your menu let's focus on the right panel, which is intended for configuring the menu structure.
As with any other WordPress element, you are able to reorganize the menu items by simply dragging and dropping them to the desired position. The order in which they appear in the backend determines their consequence in the menu on the frontend.

WordPress also allows you to create drop-down menu items, or in other words, submenus. In such a configuration, you add multiple pages, posts, categories, and custom links within the same menu item. They are going to be listed as a dropdown on your website frontend upon clicking or hovering over the parent menu item.
In case you need to nest several menu items, all you need to do is to drag and drop the desired child menu items beneath the parent item. Note that, it is essential to paste the child items slightly on the right. This will instruct WordPress that your goal is to create a submenu. If the menu items are positioned in the same line, they will be considered as separate parent items.

As you can see from the screenshot example above, the child items are indicated as such with a "sub item" label.
If you need to modify a given menu element, you can do so by clicking on the corresponding arrow icon. This action will expand all its settings, and you will be able to change its navigation label, as well as to move it around using the corresponding links.

You may also delete the item by clicking on the "Remove" button.
Now, let's pay attention to the last "Menu Settings" section within the menu editor.
The first "Auto Add Pages" checkbox allows you to automatically add all newly created top-level pages to the menu. Top-level pages are parent pages, meaning that the page is not nested under another page.
The second "Display Location" option presents all available menu locations supported by the theme you are using. Each WordPress theme supports several predefined block positions where you can actually display the menu on the frontend.
In our case, the theme structure provides only two positions - "Top Menu", which is the primary navigation menu displayed at the top of the website pages, and the Social Links Menu", which is positioned in the footer.
Naturally, to select the desired location, you need to tick the corresponding checkbox.

When you perform all the desired modifications, please do not forget to click on the "Save Menu" button to apply the changes.
Now, it is time to go ahead and check the result on your website frontend.

In the above screenshot example, you can see how the menu from our model appears. We hope you have managed to achieve the intended result, and you are pleased with the outcome.
To sum up, in this tutorial, you learned how to create and configure navigation menus in your WordPress based website. We hope this information was useful to you, and you have a clear idea of how to operate with them. As usual, we would like to thank you for trusting our guidance.

Sebahat is a young and bright woman who has become an invaluable part of our team. She started as a Customer Care Representative, mastering that role and, along the way, growing into a tech-savvy individual who is well acquainted with every support layer of the company. Driven by her aim to improve our customers’ experience constantly, she is committed to enhancing the extraordinary support we deliver.
Learn more about Wordpress in the other tutorials that we have: