
In X-Cart, the Memberships feature provides an option to group particular customers and grant them specific privileges. You can present them with exclusive access to particular products or categories of products; you can offer custom prices, discounts, and tax rates; you can support exceptional payment options, and you can even sell membership subscriptions.
Using Memberships, you could develop a strong marketing campaign and provide incentives to long-term customers who demonstrate loyalty.
In this tutorial, we are going to introduce the Memberships concept and guide you on how to crate and manage your Membership Levels in X-Cart.
To begin, please log in to your X-Cart Admin Area and navigate through the left-hand side menu bar to Users > Membership levels.

Under this section, you can see a table containing a list of all Membership levels currently available in your store. Each row represents a particular membership. It is indicated by the Membership name and displays the number of users assigned to it. The Power icon in front of each Membership determines whether it is enabled (green) or disabled (grey).
The order in which the Memberships display in this section determines in what sequence they are listed in the dropdown menu when assigning them to users. You can organize them as required by using the Crossarrow icon and dragging them to the desired position.
Now, let's see how to create your first Membership Level.
For a start, please click on the "New membership" button. Once this is done, a new row appears where you need to specify the Membership's name.

When ready, please click on the "Save changes" button. Your new Membership is going to be created and added to the list of Membership Levels.
As we previously pointed, Membership Levels can be used for various purposes. Depending on what your goal is, the process of setting the Membership is slightly different. The following lines are focused on the most common reasons you could possibly want to set your Membership Levels for.
On some occasions, you might want to offer specific products or categories of products to a particular group of customers. To achieve that, you have to assign the given Membership Level to the corresponding product(s) or product category(ies).
Through the left menu bar in your Admin Area, please navigate to Catalog > Categories.
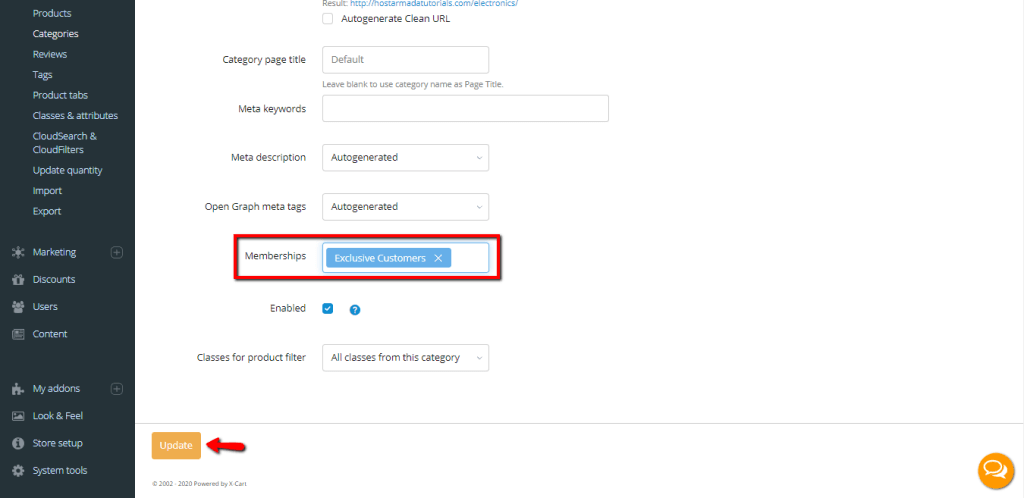
On the "Categories" page, you have to find the desired category and click on its name to edit it.

Under the "Category info" tab, please locate the "Membership" field and select the corresponding Membership Level from the dropdown menu. When ready, please click on the "Update" button to apply the changes.
Now, you have to follow the exact same steps to assign the Membership Level to the products within this category. Please navigate to Catalog > Products. When there, use the search tool to list all products within the category, select all of them by ticking the checkbox at the top of the table, click on the "Bulk edit selected" button and select the "Price and membership" option.
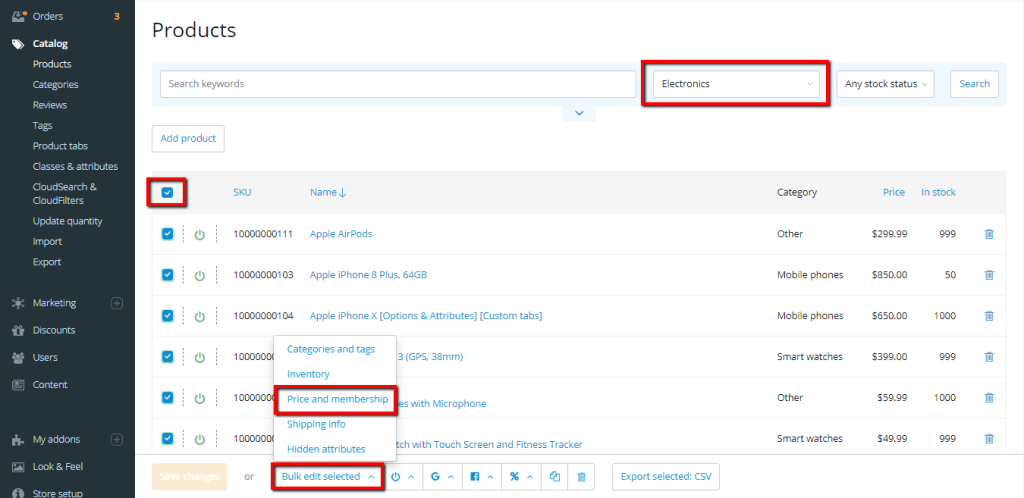
On the new page, you should locate the "Membership" field, select the desired Membership Level, and click on the "Save changes" button.

With this done, the category and all products under it are only available to the users assigned to the corresponding Membership Level. Note that if a non-member user attempts to access the category or products pages by a direct link, they are going to receive an error message. For Category pages, "Page Not Found" error is displayed, whereas, for Products pages - "Access Denied".
With Memberships, you can offer custom Discounts and Coupons to particular customers.
To learn how to configure Membership Discounts, please refer to our tutorial on How to create Volume Discounts in X-Cart.
Detailed instructions on the process of creating and configuring Coupons you can find in our tutorial based on How to create Discount Coupons in X-Cart.
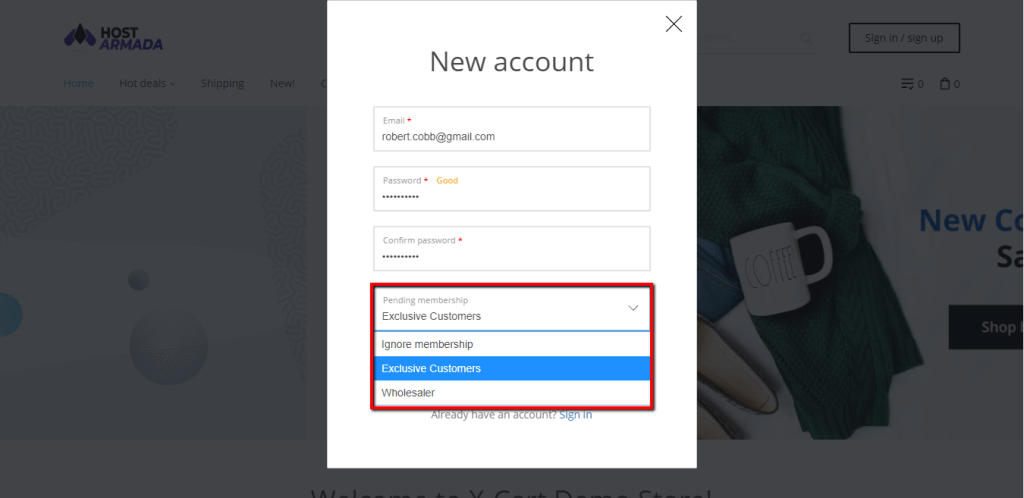
You can allow customers to sign up for Memberships. With this option enabled, new and existing customers are going to be able to apply for the Membership Level they desire.
You can find this feature by navigating through the left menu bar to Store setup > Cart & Checkout, "General" tab > "Customer Zone settings" section.
Locate the "Allow customers to sign up for membership" option, which is disabled by default. Click on the toggle switch button and once it is set to "ON", please click on the "Submit" button to apply the change.

When enabled, a "Pending membership" field is going to be included on the Account Signup page and User Account Details page.
Whenever an application form is submitted, you have to approve it to assign the customer to the respectful Membership Level. You can manage the pending membership requests within the "Users list" section in your Admin Area (Users > Users list).
The "Access level" column in the table of users indicated if there is a membership request submitted by the user.

To access the user " Account details" section and approve the membership request, please click on the user's email address. Locate the "Membership" field, select the appropriate Membership Level from the dropdown menu, and click on the "Update" button to apply the changes.

With this done, you have successfully assigned the user to the Membership Level they requested.
To sum up, in this tutorial, you have learned how to create and manage Membership Levels, how to assign them to products and categories, and how to allow users to apply for them. We hope this information was useful to you, and your new skills will come in handy while managing your X-Cart Online Store. In case you have experienced any difficulties, please do not hesitate to contact our Support Team.

Sebahat is a young and bright woman who has become an invaluable part of our team. She started as a Customer Care Representative, mastering that role and, along the way, growing into a tech-savvy individual who is well acquainted with every support layer of the company. Driven by her aim to improve our customers’ experience constantly, she is committed to enhancing the extraordinary support we deliver.
Learn more about X-Cart in the other tutorials that we have:
