
Microsoft Outlook is unarguably one of the most popular and widely used Email Clients. Incorporating a robust feature set, such as calendar, task manager, contact manager, and more, Outlook remains the most comprehensive software primarily used as an email application. In this tutorial, we will step-by-step guide on setting up your Email Accounts in the Outlook Client.
Please bear in mind that this tutorial assumes the email account you will be setting up in Outlook exists on your hosting account. If you have not created it yet, please take a moment to review our tutorial based on How to create Email accounts in cPanel.
Lastly, you will need to gather the configuration details required to begin the Outlook email setup:
Suppose you are a HostArmada customer and are using our email services. In that case, you will find the required details in the “[HostArmada] New Account Information” email containing all the essential information of your hosting account with us. You can directly review the email from your Client Area by clicking on the email icon located at the top menu bar.
You can also find the configuration details in your cPanel account by navigating to the EMAIL section > Email Accounts > Connect Devices.
In case you have any difficulties finding the details, please make sure to submit a ticket request to our team, and they will gladly provide you with them.
Whenever you are ready, please open the Outlook Email Client. Once opened, please access the “File” tab located at the Email Menu bar at the top.
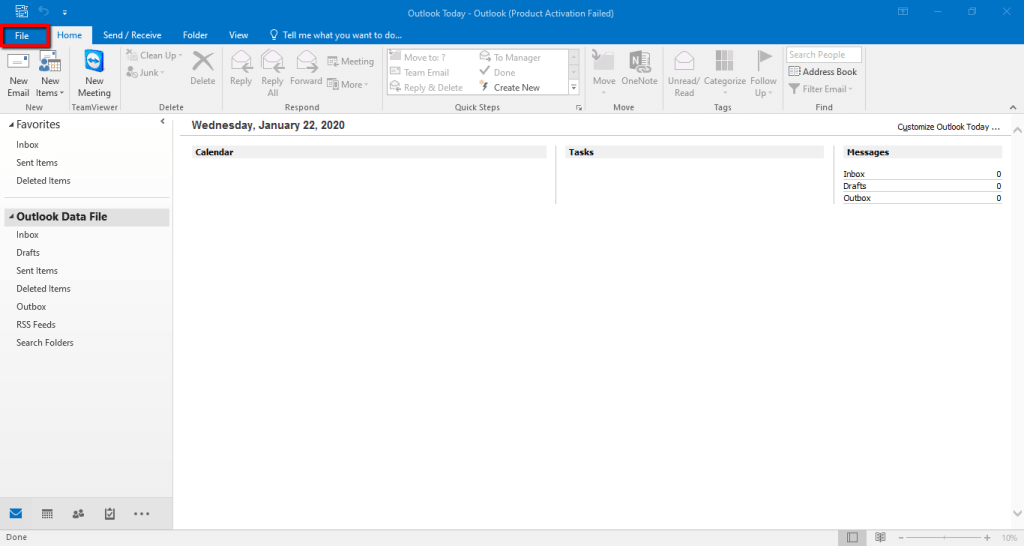
On the new screen, please click on the “Add Account” button.

This action will take you to the “Add Account” dialog where you will need to select the “Manual setup or additional server types” radio button and click on “Next”.

At the second “Choose Service” step, please make sure to select the “POP” or “IMAP” radio button and hit “Next”.

The Outlook 2016 email application will redirect you to the “Account Settings” section, where you need to enter your email setup details. You will notice that it is divided into a few areas containing different information.
User Information:
Server Information:
Logon Information:
The “Require logon using Secure Password Authentication (SPA)” checkbox controls whether to use SPA for server login. In our case, please make sure to keep it disabled.
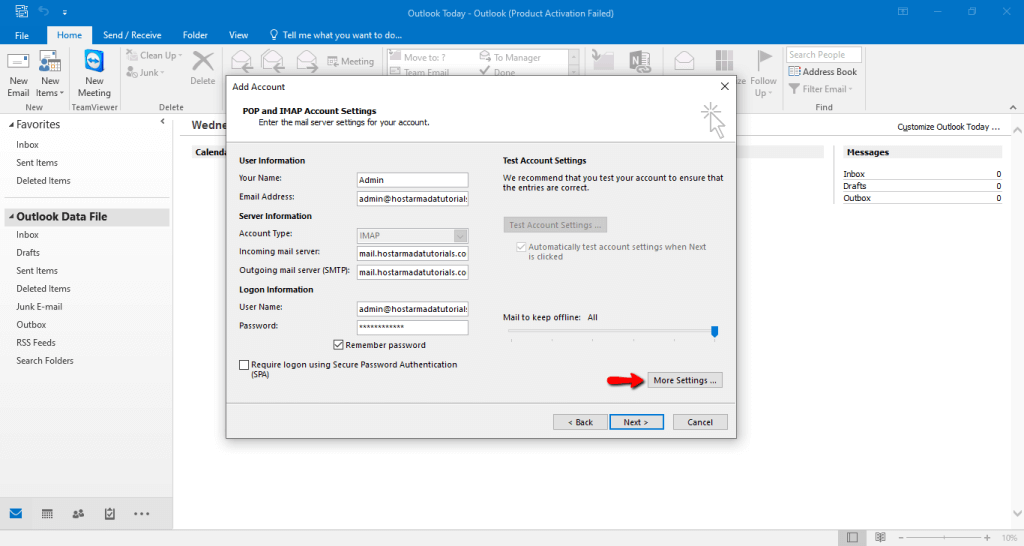
When you are ready, please click on the “More Setting” button to configure the ports and encryption type.
When you have the “Internet E-mail Settings” dialog opened, please switch to the “Outgoing Server” tab.
To send emails using the Outlook Email Client successfully, please make sure to tick the “My outgoing server (SMTP) requires authentication” checkbox.
The radio buttons below determine the login credentials which you will use. You can leave it set to “Use same settings as my incoming mail server” unless you are using a different SMTP server to send emails exclusively.

Now, please switch to the “Advanced” tab and configure the ports and encryption methods.
For the “Incoming server (IMAP)”, you can either use the default, non-SSL port 143 or port 993, which runs over an encrypted connection with SSL. For port 143, you should set the encryption to “None”, while for port 993, you should configure “SSL”.
In case you want to do a POP3 Outlook email setup, you can either use the default, non-SSL port 110, or the secure port 995. For port 110, you should set the encryption to “None”, while for port 995, you should configure “SSL”.
For the “Outgoing server (SMTP)”, you can use the default, non-SSL port 25. Alternatively, you can use the encrypted ports 465 or 587. If you use port 25, you should set the encryption to “None”, as for port 465 - “SSL”, and for port 587 to “TLS”.

When you are ready, please click on the “OK” button to continue further.
Afterward, the email application will direct you back to the “Account Settings” dialog, and you will need to click on the “Next” button to continue with the Outlook Email setup.
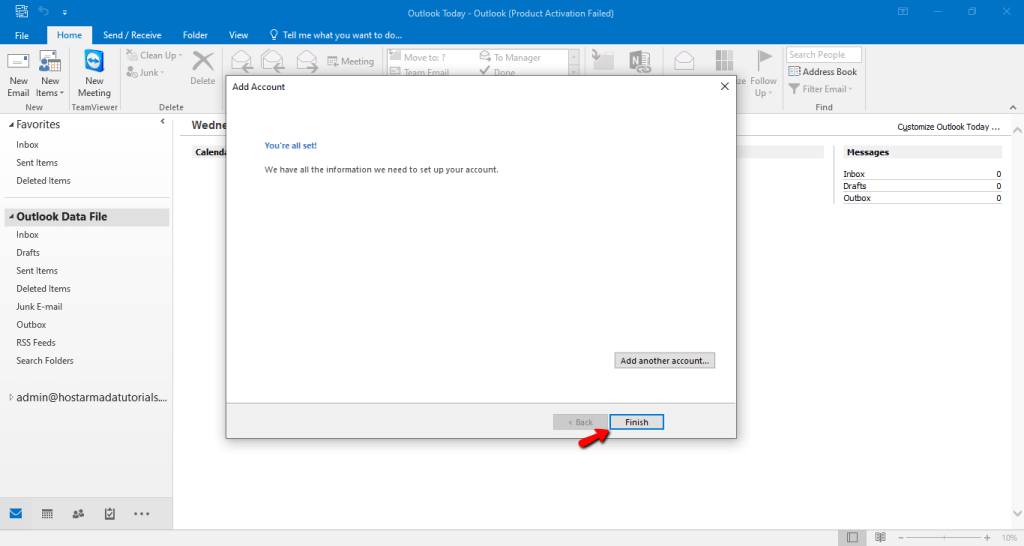
Once you have done the above, the Outlook client will initiate a test of the account settings to confirm the incoming and outgoing configurations inserted correctly. When it completes the test, you will need to click on the “Close” button on the final screen.

Finally, click on the “Finish” button, and you will be ready with the Outlook email setup.
As soon as you finalize the Outlook Email setup, you will see all your messages displayed in the middle section. Please bear in mind that if the email account contains a lot of data, it might take some time until it is successfully synced.
Well done! You have managed to configure your email account in the Outlook Email Client successfully. We hope you have found our tutorial useful and our guidance easy to follow. Should you require any further assistance, please do not hesitate to contact our Support Team.

Sebahat is a young and bright woman who has become an invaluable part of our team. She started as a Customer Care Representative, mastering that role and, along the way, growing into a tech-savvy individual who is well acquainted with every support layer of the company. Driven by her aim to improve our customers’ experience constantly, she is committed to enhancing the extraordinary support we deliver.
Learn more about Email in the other tutorials that we have: