CAPTCHAs (Completely Automated Public Turing Test to Tell Computers and Humans Apart) are designed to identify humans from bots and to protect websites from spam, phishing, and hacker attacks. They use an advanced risk analysis engine and adaptive challenges to keep automated software from connecting with abusive intents to a website. In simple words - you can use CAPTCHA to control who has access over different areas of or your entire site - legitimate visitors or web robots.
Google reCAPTCHA is a free CAPTCHA service that can be integrated into any website or web application. As the name suggests, the service is developed and supported by Google, which makes it extremely popular and widely used. To add reCAPTCHA to your website or web app, you need an API key pair. It consists of a Site Key, intended for invoking reCAPTCHA service on your site or app, and a Secret Key intended for authorizing the communication between your backend and the reCAPTCHA server.
In this tutorial, we are going to guide you on how to set up your Google reCAPTCHA account and acquire the necessary keys.
In order to set up your reCAPTCHA account, all you need is an existing Google account. We trust you have one, however, if you do not, you will be prompted to create a new one during the setup.
To begin, you need to go to Google reCAPTCHA. When you land on the intended page, please click on the "Admin console" button at the top right corner.

Depending on whether you have signed into your Google account, you will be prompted to either select one of your existing accounts, sign up, or create a new account.

As soon as you sign in to your account, you will be automatically presented with the "Register a new site" form.
Within the first "Lebel" field, you have to enter a title, which is only for your reference and will help you quickly recognize this site in the future.
Under the second "reCAPTCHA type" section, you will find two radio buttons presenting each verification type.
Briefly explained, the reCAPTCHA v3 works in the background and does not require your visitors to take any additional actions to be verified. The reCAPTCHA v2, on the other hand, may require particular user interaction based on the selected type:
In case you need an in-depth explanation, please refer to Google's official documentation.
Within the following "Domains" section, you need to enter the actual domain name of your WordPress website. Note that you have to insert only the domain name, i.e., "yourdomain.com", excluding any protocol, path, or ports. If needed, you may enter more than one domain name, where each one should be placed on a separate line. Also, you should know that all subdomains associated with your domain name(s) will be automatically included.

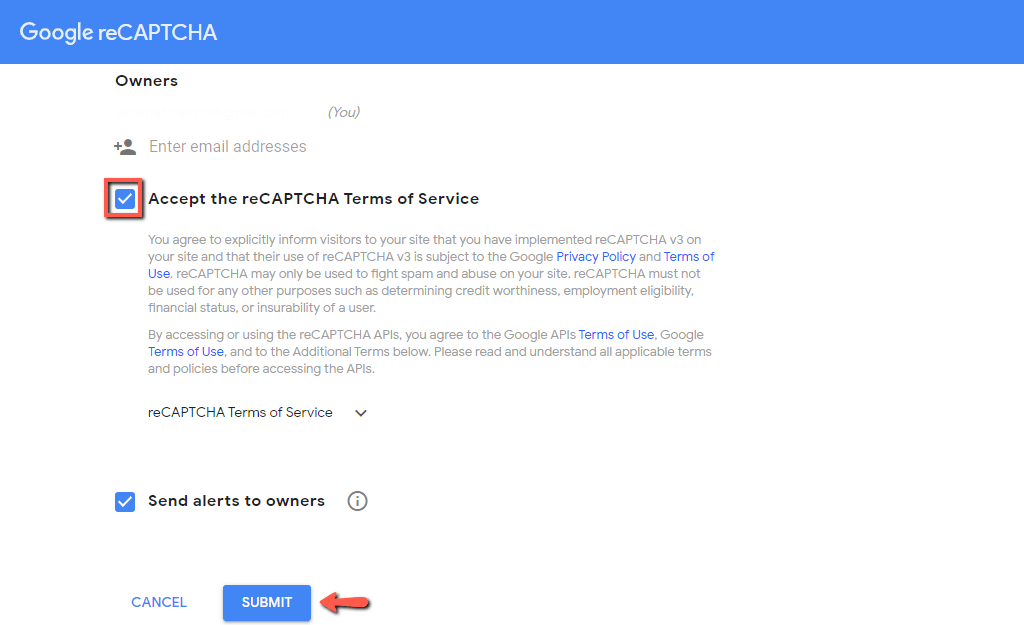
Under "Owners", you will see listed your Google account. If needed, you may add more people by specifying their Google accounts.
Next, please make sure to tick the “Accept the reCAPTCHA Terms of Services” checkbox and then click on the “SUBMIT” button.

Once this is done, you will be provided with the required “Site Key” and “Secret Key”.

With this done, you are all set here. Please note that these Keys are sensible data, therefore, you need to keep them secure and not share them with anyone.
We trust you have managed to easily set up your Google reCAPTCHA account, following our instructions. Now, you are ready to proceed with the integration of Google reCAPTCHA into your website or web application.

Sebahat is a young and bright woman who has become an invaluable part of our team. She started as a Customer Care Representative, mastering that role and, along the way, growing into a tech-savvy individual who is well acquainted with every support layer of the company. Driven by her aim to improve our customers’ experience constantly, she is committed to enhancing the extraordinary support we deliver.