
Now that you have completed the installation of Drupal and you have your website up and running the natural second step is to get familiar with its Admin Dashboard. If you have any previous experience with CMSs you will know that the Admin Backend is where you will be configuring, maintaining, developing, and customizing your website. Therefore, knowing how to operate with it hassle-free is quite important when it comes to effective management. As you have probably guessed, this will be the main focus of our tutorial - we will get an in-depth look at the admin area essentials to ensure you will be able to easily navigate through it and get the most of it!
The Administrative Login page is accessible over a specific URL address. In Drupal that varies depending on the application version. In our tutorial series based on Drupal, we will be focused on Drupal 8, as at this time it is the latest version available.
In order to access your Drupal 8 Admin Dashboard, you will simply need to include a "/user/login" suffix after your domain name, i.e. "domain.com/user/login" where "domain.com" stands for your own domain name, therefore please make sure to replace it.
For older Drupal versions, such as Drupal 6 and 7, you will need to use "domain.com/?q=user" where again you will need to input your own domain name.
Once you enter the above-mentioned URL address you will be presented with the Admin Login page which will look as shown in the following screenshot example.

You will need to enter your admin account login credentials in the corresponding fields and click on the "Log in" button.
Now, before we step into reviewing the Admin Dashboard a few words for your Admin Account. The account created during the installation of Drupal is the SuperUser account, also referred to as "User 1". For instance, when you log in to the Dashboard you will notice the "user/1" suffix in the URL that actually represents the user currently logged in. The SuperUser is above all users and owns all privileges for managing content and administering the site. The privileges of the SuperUser cannot be revoked under any circumstances.
Now that you have logged in to your Drupal Admin Dashboard, you will see a toolbar at the very top of the page. This is referred to as the "Administration toolbar" and as you will notice it is consisting of three main sections:

The "Manage" section contains a submenu that holds access links to all parts of your Drupal backend where you will be able to perform changes applicable to specific aspects of your website.
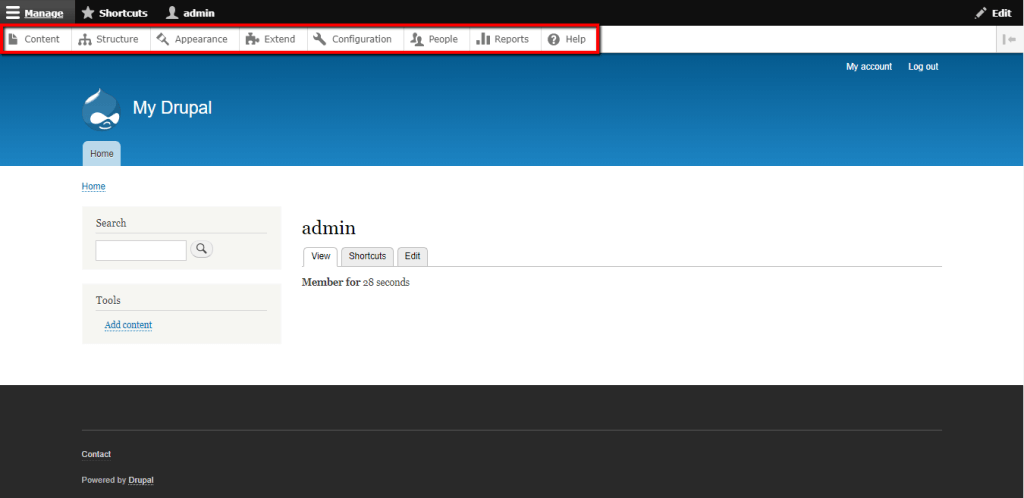
The "Shortcuts" section contains a submenu with shortcut access buttons to various sections of your Amin Area. You can add any desired section by clicking on the star icon available on the corresponding page. The star icons highlighted in yellow indicate the section is already added to the shortcuts.

The "Admin" section contains a submenu with access links to view and edit your account as well as to log out from the Admin Dashboard.

That is pretty much it! We hope it is all clear now and you have a brief idea of how to efficiently navigate through your dashboard. Of course, this was just an overview to get you familiar with the interface and you will find detailed instructions on how to make the most of these features in the following tutorials in this category. We would like to thank you for trusting our guidance and welcome you to contact our Support Team if any questions arise.

Sebahat is a young and bright woman who has become an invaluable part of our team. She started as a Customer Care Representative, mastering that role and, along the way, growing into a tech-savvy individual who is well acquainted with every support layer of the company. Driven by her aim to improve our customers’ experience constantly, she is committed to enhancing the extraordinary support we deliver.
Learn more about Drupal 8 in the other tutorials that we have: