One of the defining aspects of the TYPO3 CMS is its flexibility and rich set of features. The majority of these key features are brought to the CMS by extensions that are either created by its developers or from the vast community this application has built throughout the years. In this tutorial, we are going to go over the process of managing your existing extensions and installing new ones. Extensions can be installed from the official extension repository. You also have the freedom to develop them yourself or download them from a third-party vendor. Let’s begin!
To begin managing your extensions, you need to log into your admin dashboard first. To do that, please add “/typo3” to your domain name - for example, “mycms.com/typo3” where “mycms.com” is your actual domain.

Accessing the mentioned URL will show a login page, where you have to enter your login credentials to access the backend. We also highly recommend checking our TYPO3 Backend Overview tutorial, which will introduce the basics.
Once you have logged into your dashboard, please point your attention to the left, where you will see the Module Menu.

Right under the “Admin Tools” section, you will see the “Extensions” option. When you click on it, the page will refresh, and you will see a big table section populated with all the installed extensions. These will typically be system extensions that are needed for the smooth operation of TYPO3, and you should not delete them unless you are fully aware of what their functionality is.
As mentioned in the previous paragraph, once you land on the “Extensions” page, you will locate a list containing all installed extensions.

Let’s go over all of the columns and explain what they stand for.
On the top left side of the table section, you will find a search field, allowing you to filter out the extensions you need.

Now that you know all the actions you can perform with existing extensions let’s see how you can install new ones!
As mentioned earlier, you can either install extensions directly from the official TYPO3 Extension Repository, extensions you have created yourself, or extensions bought from a third-party vendor. To install an extension you created or downloaded from another source, please click on the icon, resembling a pointed up arrow, located on the top left corner of the page.

Upon doing that, a new section will be displayed right below. You will be allowed to select the files of your extension from your local computer. To do so, please click on the “Choose File” button.
Alternatively, you can simply drag and drop the required file into the newly expanded area.

Finally, when you have selected your extension, please press the “Upload!” button located at the bottom of the section.
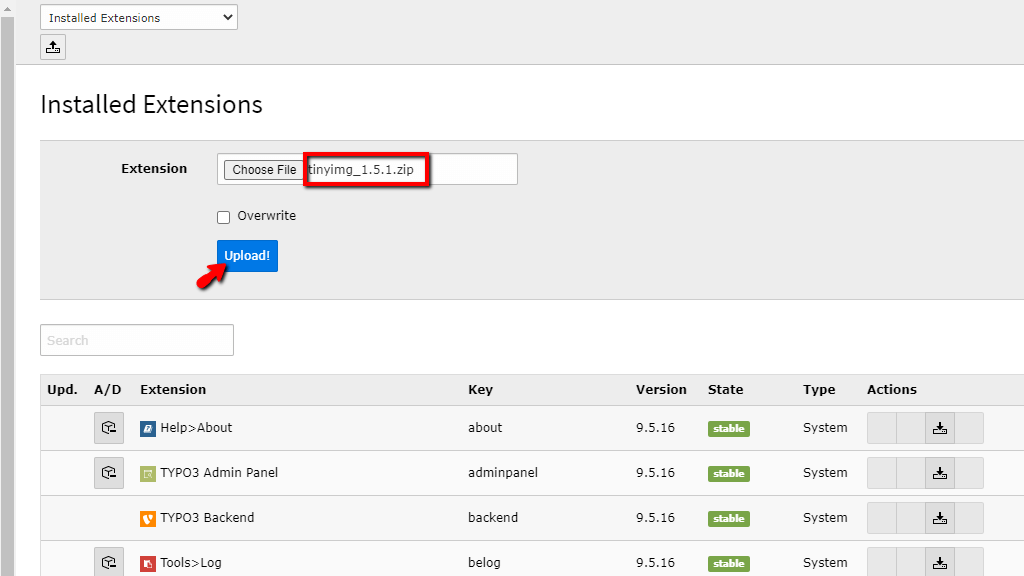
Clicking on the “Upload!” button will start the process immediately, and after a few seconds, the extension will be installed. The page will be refreshed, and you will see a notification on the top indicating the installation was successful.

The newly installed extension will be immediately activated, and you can start using it right away.
To install an extension from the official TYPO3 Extension Repository, please use the dropdown menu located on the top left side of the screen. By default, it will be set to “Installed Extensions”. Please expand it and from the list choose the “Get Extensions” option.

The page will be refreshed, and you will see a new table section, populated with the available extensions from the official Repository. You will notice that the table columns are similar to those in the installed extensions table.

As you can see, there are lots of available extensions. To filter them out and find the one you need, you may use the search bar, located at the top left corner of the table section.
To install an extension, please click the icon located on the far left side of the row corresponding to the extension you need.

If there are no dependency issues with the extension, it will be installed immediately. Otherwise, you will receive a message, letting you know what dependencies you need to correct to proceed with the extension installation.
There you have it! The way to manage your current extensions and how to install new ones in TYPO3 CMS. As we offer fully managed hosting services, we offer free extension installations for our clients if they are not confident enough to go through this process on their own. To take advantage of this option, please submit a ticket to our Technical Support team through your Client Area.

Sebahat is a young and bright woman who has become an invaluable part of our team. She started as a Customer Care Representative, mastering that role and, along the way, growing into a tech-savvy individual who is well acquainted with every support layer of the company. Driven by her aim to improve our customers’ experience constantly, she is committed to enhancing the extraordinary support we deliver.
Learn more about TYPO3 in the other tutorials that we have: