Learn TYPO3
TYPO3 is a free and open-source, enterprise-class CMS tailored for business projects. Divers, reliable, and scalable, it is the real winner for complex websites. If TYPO3 is your chosen CMS, we are going to accompany you in your adventure, starting with the very first step in it - installing the software.
In the following lines, we are going to guide you on how to install TYPO3 with one click through the Softaculous Auto Installer integrated into cPanel.
For a start, you have to access your cPanel account. In case you are not sure how to achieve that, please find detailed instructions in our guide based on How to access the cPanel service.
Once you are logged in, please navigate to the "Software" features group. Under it, you can locate the "Softaculous Apps Installer" tool. Please, click on the icon to access it.

When there, in the left-hand sidebar, you can see a search tool. Please use it to filter the applications and find TYPO3.

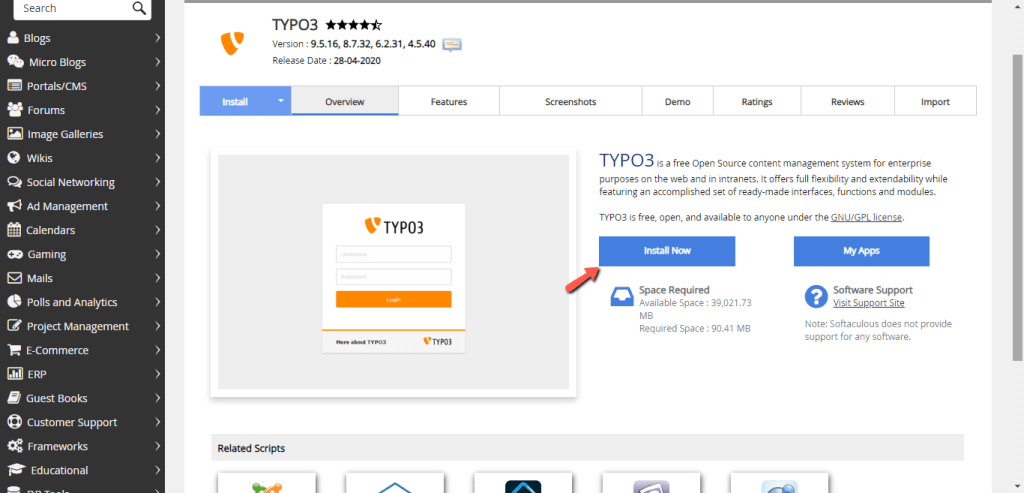
Afterward, please click on the "TYPO3" link displayed in the search result to access the application installer interface.
Now that you have accessed the TYPO3 overview page, please click on the "Install Now" button to begin the installation process.
Upon doing that, you are redirected to the installation page, where you need to specify the required configuration details. To keep it consistent, we are going to separately review each of the sections starting with the first "Software Setup" section.

The first thing you need to select is the installation version. At the time this tutorial is written, Softaculous supports TYPO3 4.5.40, 6.2.31, 8.7.32, and 9.5.16. Please bear in mind that some of the older versions might be deprecated. Therefore, we strongly recommend that you always choose the latest available version unless another one is strictly required.
Next, you have to configure the installation URL settings:
Next are the "Site Settings" and "Admin Account" sections.

The “Site Settings” section includes only one "Site Name" field. This represents the main title of your website and the text displayed in the browser title bar. The value entered here can be changed anytime in the future.
Within the "Admin Account" section you have to specify your TYPO3 Admin account login credentials:
Last is the "Advanced Options" section, which contains optional settings. Therefore you might as well skip it. If required, you can expand it by clicking on the "+" sign.
You are allowed to give your database a custom "Database Name" and change the database "Table Prefix". You can disable the application update notifications sent via email by ticking the checkbox. You can control the "Backup Location", the frequency of the Softaculous "Automated Backups" and the "Backup Rotation". Please note that these backups are stored under your hosting account, and they demand available space.
If you are using one of our shared hosting solutions, HostArmada is already backing up your data and storing it on remote servers for enhanced security.
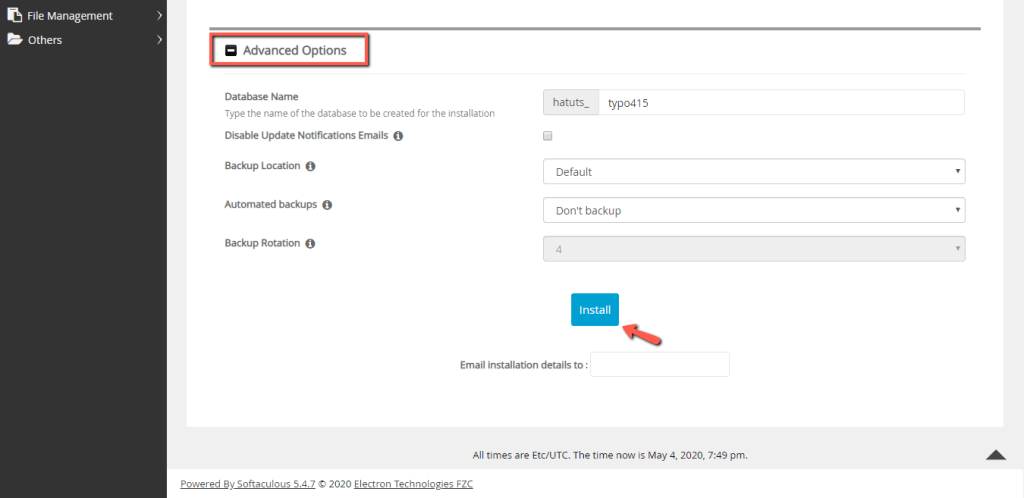
When you are ready, please click on the "Install" button to initiate the process and allow it with a few moments to be completed.
Once this is done, you are presented with the final screen, which contains your website URL and your TYPO3 Admin Login URL.

With this done, you have successfully installed TYPO3. The application is well known for its rich out-of-the-box feature set. Thus you might want to start exploring what it has to offer and start building your new website. As we previously pointed, we got your back in your TYPO3 journey, so we want to welcome you to check our TYPO3 tutorial series. We are confident you are going to find a lot of useful information and enhance your skills and knowledge. If, at any given moment, you have come across any issues or difficulties during the installation, please do not hesitate to contact our Technical Support team by submitting a ticket request from your HostArmada Client Area.

Sebahat is a young and bright woman who has become an invaluable part of our team. She started as a Customer Care Representative, mastering that role and, along the way, growing into a tech-savvy individual who is well acquainted with every support layer of the company. Driven by her aim to improve our customers’ experience constantly, she is committed to enhancing the extraordinary support we deliver.
Learn more about TYPO3 in the other tutorials that we have: