
In this tutorial, we will introduce the Domain Management section available under your HostArmada Client Area (“Client Dashboard”). We will guide you on how to maintain your domain names with HostArmada, how to register new domain names and how to transfer domain names from other providers to us.
For a start, please log in to your HostArmada Client Area. On the Home Page, you will notice the “Domains” block which indicates the total number of domain names you have with Host Armada, as well as the number of currently active domain names. Beneath that, you have two Quick Access buttons which will redirect you to the domain registration or domain transfer pages.
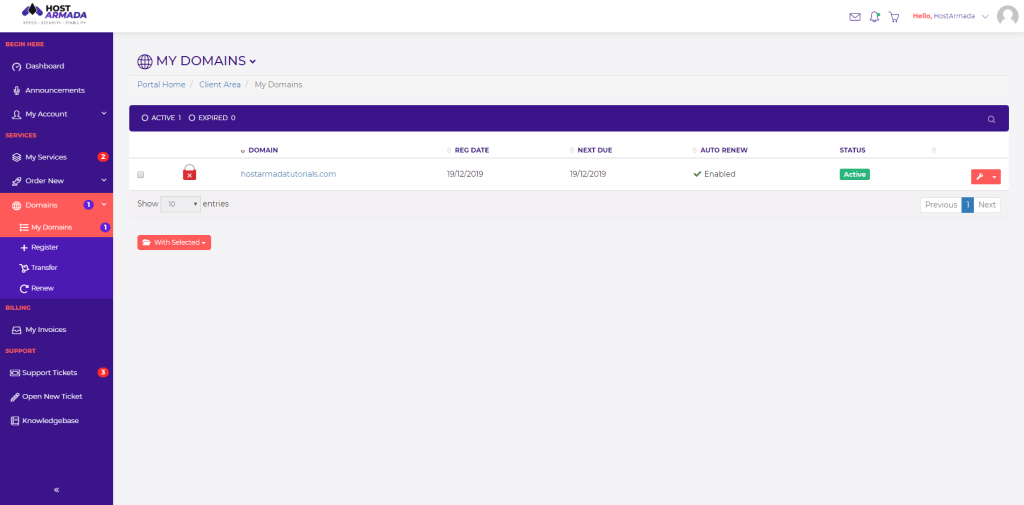
If you expand the “Domains” section in the left-hand side menu bar you will be presented with a few options: to register, transfer, and renew domain names, as well as to access the domain management page. As we will be reviewing it in this section, please click on “My Domains”.

Under the “My Domains” page you will see a list of all the domain names you have registered and transferred to HostArmada. Each row displays the information of the corresponding domain name, such as registration date, next due date, auto-renewal status, and domain status. The padlock icon indicates whether there is an active SSL certificate installed on the given domain name.
In the following section, we will review the process of further managing your domain names.
While you are on the “My Domains” page, please click on the arrow icon next to the corresponding domain name and you will be provided with a few options. In order to further manage the domain name, you can click on “Manage Domain” or directly on the wrench icon.

The first information block displays the status of the domain name, the registration, expiration and next due dates, as well as the billing information. Beneath these details, you will notice a few Quick Access buttons:
The second “Nameservers & DNS Zone” block is where you can manage your nameservers, as well as the DNS records of the domain name. You will see to radio buttons: “Use default nameservers” meaning the nameservers of your hosting account with HostArmada and “Use custom nameservers” in case you would like to enter your own nameservers.

Below that you will see a list of available additional service you can purchase and apply to your domain names if needed.
The domain registration process is quite simple and straightforward. In order to do that, please either click on the “Register” button available on the Home Page under the “Domains” block or on the “Register” option in the left menu bar.
On the new page, all you will need to do is to enter the desired name and select the domain extension (TLD) from the dropdown menu.
Once you do that, please click on the “Check Domain” button to confirm it is available for registration.
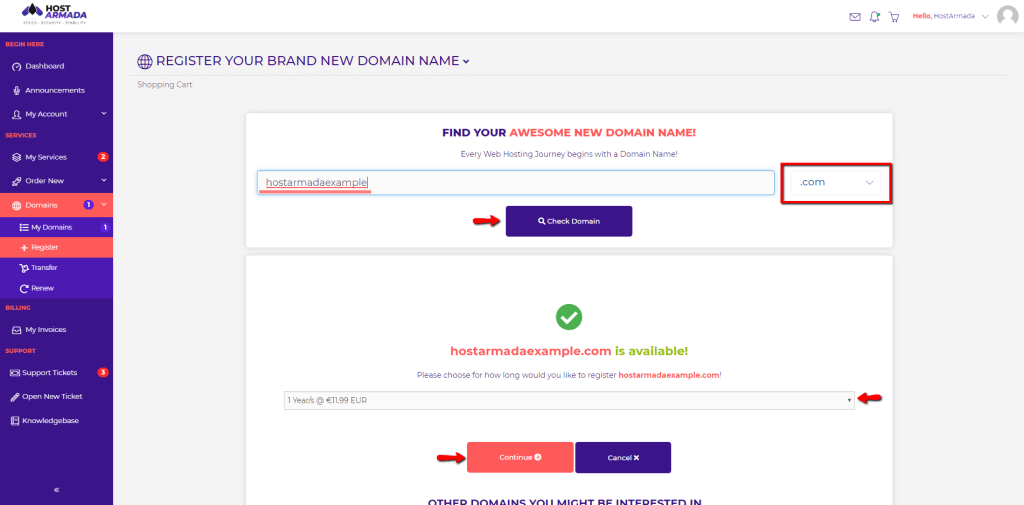
After you receive the message stating the domain name is available for registration, please select the registration term from the dropdown menu and click on the “Continue” button to further proceed with the purchase.
Once this is done you will be provided with an option to add a hosting package associated with the domain name as well as to configure your nameservers in advance.
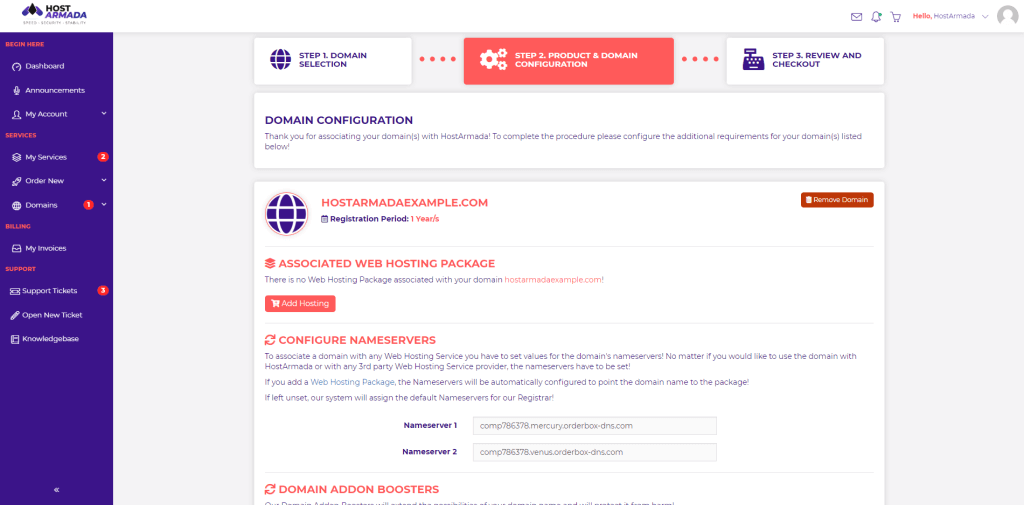
You will also be able to select any desired additional services on the fly. Once ready - click on the “Continue” button to proceed to the last step.

On the final step, you will be able to review your billing details and your purchase. You can also leave additional notes if needed. They will be taken under consideration by our team during processing your order.
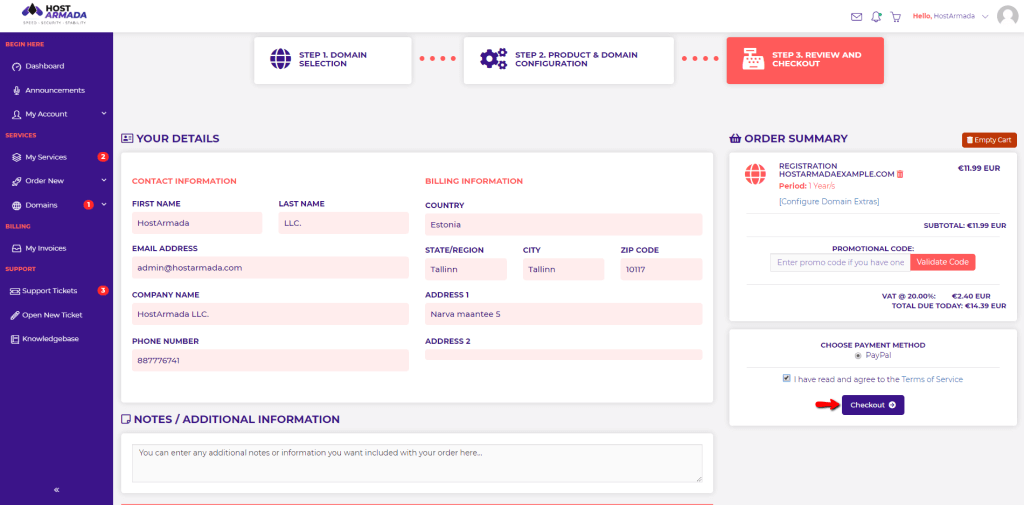
Please note that in order to process further you will need to agree to our Terms of Services. You will find a direct link where you can review them. Once you are ready, please click on the “Continue” button in order to process the payment and finalize the purchase.
A few important notes to make concerning the process of transferring a domain name from one Domain Registrar to another. There are certain requirements that need to be fulfilled before you step into placing a transfer order.
Please note that depending on the domain TLD the above-mentioned criteria may differ. Some ccTLDs (country-specific extensions) have specific transfer requirements.
The process of placing a domain transfer order is pretty much the same as registering a new domain name with the main difference that you will be required to provide the EPP code (Authorization Code) on the second step during the order.

The rest of the process should be done in the same manner as registering a new domain name.
Once the order is completed and processed by HostArmada, you will receive confirmation emails sent to the current administrative email address associated with the domain name. After the process is successfully initiated it may take up to seven days to be completed.
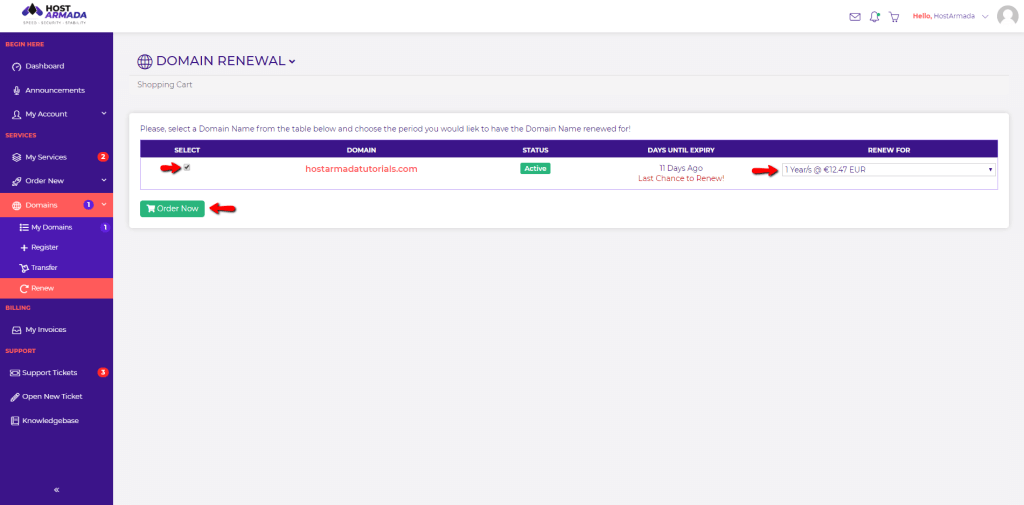
The domain renewal process is extremely simple and it only concerns you in case you have disabled the auto-renewal option or in an event of payment failure. To manually renew your domain name(s), please click on the “Renew” option displayed under the “Domains” section at the left menu bar.
Afterward, select the domain name(s) by clicking on the corresponding checkbox(es), select the renewal term from the “Renew For” dropdown and click on the “Order Now” button.
Once this is done, all you will need to do is to confirm you agree to our Terms of Services and click on “Checkout” to proceed with the renewal payment.
That is all! Now you know how to manage your domain names with HostArmada, as well as how to register and transfer domain names. We hope you have found the information in this tutorial useful and the instructions easy to follow. In case you happen to experience any difficulties, please make sure to contact our Support Team for further assistance.

Sebahat is a young and bright woman who has become an invaluable part of our team. She started as a Customer Care Representative, mastering that role and, along the way, growing into a tech-savvy individual who is well acquainted with every support layer of the company. Driven by her aim to improve our customers’ experience constantly, she is committed to enhancing the extraordinary support we deliver.
Learn more about Client Area in the other tutorials that we have:
