Introduction
LiteSpeed Cache for WordPress is a powerful optimization plugin. It is a collection of multiple features built-in one handly tool, which is easily integrable directly into your WordPress Admin Dashboard.
After installing the plugin, it is essentially important to review and configure its settings with attention to achieving the best possible results.
In this tutorial, we will overview the caching settings, which will allow you to control how exactly the plugin is utilized - what elements of your website are being cached, how long the cache is kept, how to purge it, and more.
Getting Started
To begin, you have to log into your WordPress Admin Dashboard. To do that, please add “/wp-admin” to your domain name - for example, “mywordpress.com/wp-admin” where “mywordpress.com” is your actual domain.
Once you are in, please hover over the “LiteSpeed Cache” option on the module bar on the left. When the submenu is expanded, please click on the “Cache” option.

Upon doing that, you will be redirected to the Cache configuration section.
Configuring Cache Settings
Under the "Cache" section, you will be provided with access to all the configuration settings concerning the site’s resources and whether they should be cached or not by the plugin. The amount of settings available is quite vast and gives you flexibility in terms of the caching options you can use. In the following lines, we will go over all the default settings and the optimal values we believe you should place in order to get the best performance.
Caching Settings
- Enable Cache - This toggle switch’s default position is “ON”. This enables LSCache, and you should not change it.
- Cache Logged-in Users - The default position for this toggle switch is “ON”. It is useful if you have a few logged-in users who are accessing the site and logging in regularly. If you have a lot of people logging in, it may not be a great idea, as then a lot of pages will be created for each individual user, which may lead to potential conflicts. For big sites with a lot of logged-in users, we recommend “OFF”, while for smaller sites with fewer users, it could be left “ON”.
- Cache Commenters - This setting defaults to “ON”. If you are using moderation for guest comments on your WordPress website, having this option enabled will serve a cached version of the page, meaning the people leaving comments will not see their “under moderation” comments. You can disable it if you are not using moderations for your posts.
- Cache REST API - This option defaults to “ON”. Being in this state will allow the plugin to cache REST API calls. We recommend leaving it turned on unless you notice any functions on your website breaking.
- Cache Login Page - The default choice here is “ON”, and we highly recommend keeping it as such. It will offer great protection when dealing with bot attacks. Only turn it off in case it interferes with your login page’s design and functionality.
- Cache Favicon.ico - This defaults to “ON” and you should keep it as such so the plugin can cache your favicon icon.
- Cache PHP Resources - This setting defaults to “ON” and you should keep it enabled. It will be very beneficial if you have plugins and themes with poorly optimized PHP code.
- Cache Mobile - The default setting here is “OFF”, and you should keep it this way unless you have mobile-specific content on your pages.
- List of Mobile User Agents - Leave this content box empty, as it will only be used if the above option is set to “ON”.
- Private Cached URIs - Leave this content box blank unless you have users that spend the majority of their time on your website logged on.
- Force Cached URIs - All URLs listed in this content box will be cached, regardless of any settings that may prevent that.
- Force Public Cache URIs - All URLs listed in this content box will be cached in the public cache, regardless of any settings that may prevent that.
- Drop Query String - This content box contains a list of query strings that should be dropped and cached separately. You should leave the default entries here unless you want to drop additional query strings from your URLs. In this case, you should type them in.

TTL Settings
This tab will contain settings related to the duration of the various caching types. We highly recommend leaving all the settings with their default values unless the website you are working on will NEVER be changed.
- Default Public Cache TTL - Leave this text field with the default value: 604800
- Default Private Cache TTL - Leave this text field with the default value: 1800
- Default Front Page TTL - Leave this text field with the default value: 604800
- Default Feed TTL - Leave this text field with the default value: 604800
- Default REST TTL - Leave this text field with the default value: 604800
- Default HTTP Status Code Page TTL - Leave this content box with its default values:
- 403 3600
- 404 3600
- 500 3600
Purge Settings
This tab will allow you to configure a setting that will purge the cache when certain actions are performed on the website. An example of that is the complete cache purge when the WordPress core is upgraded. The default setup, in our opinion, is perfectly fine with a few exceptions.
- Purge All On Upgrade - You should leave this toggle switch at its default “ON” position.
- Purge Stale - This will be useful to you in very rare cases and only in situations where you really understand how it works. We recommend setting the toggle switch to “OFF”.
- Auto Purge Rules For Publish/Update - The checkboxes selected by default here are completely fine. If certain options are never updated when you update a new post, you can tick them off. If you are using a lot of widgets on posts that receive comments regularly - the “All pages” option is something you can consider.
- Scheduled Purge URLs - You may use this content box to type in URLs you want to purge the cache for at specific times.
- Scheduled Purge Time - Please use this option to define the time when you want the cache purge to occur for the pages above.
- Purge All Hooks - This content box contains hooks (scripts that are executed after a certain action is performed on your site). The default ones are great, as they will most certainly include a design change. If you are using a plugin, which directly affects any visual aspects of your site, you should add all the hooks related to it there. If you don’t know how to do that or the plugin does not have such hooks, then simply manually clear the cache after every design change you made, to ensure that the new implementations will be visible on your pages.

Exclude Settings
The settings located under this tab will allow you to exclude URLs, query strings, or any other content elements from the cache. The majority of these changes here are only useful when you are investigating issues for certain pages, and you want to exclude them from the cache.
- Do Not Cache URIs - Using this content box, you can enter pages that you wish to exclude from the cache. You should list pages that collect information from your website visitors, such as contact forms and login forms.
- Do Not Cache Query Strings - Using this content box, please enter certain query strings you wish to exclude from the cache. Useful in cases where your query strings refresh content regularly.
- Do Not Cache Categories - Use this content box to specify categories you would wish to exclude from the cache.
- Do Not Cache Tags - Use this content box, to define tags you would wish to exclude from the cache.
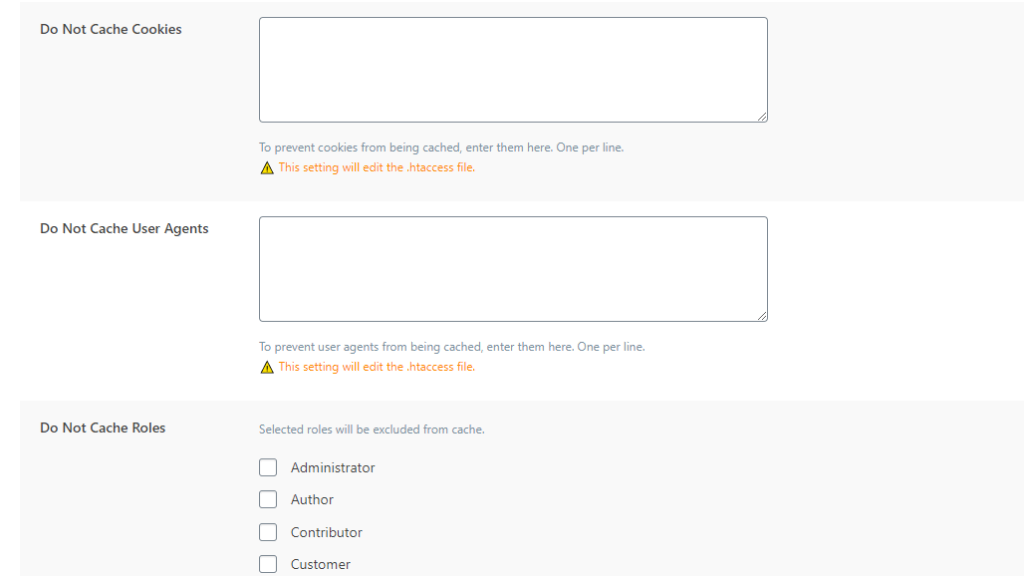
- Do Not Cache Cookies - Use this content box to enter cookies you would wish to exclude from the cache.
- Do Not Cache User-Agents - Use this content box, to specify user-agents you would wish to exclude from the cache.
- Do Not Cache Roles - Use the provided checkboxes to exclude the desired roles from the cache.
ESI Settings
ESI or Edge Side Includes is a technology that allows you to fragment the cached or uncached parts of a page. Afterward, these fragments are all assembled to create a full version of the page containing the parts which the user needs to see. These fragments can be saved as both private or public cache and have custom TTLs, based on the previous configurations.
The public cache is the type of cache everyone sees and is the same for everyone accessing the site. The private cache is an individual cache type available to the specific visitor, based on their session ID or IP address. The LiteSpeed web server uses ESI to store these different types of caches and use them to create parts of the pages, that would otherwise require a full cache purge to be up to date. For example, let’s imagine a huge website with a lot of static content, which almost never changes. Let’s imagine it has a “Recent Posts” sidebar, containing all the recent posts that are published in real-time.
Without ESI, whenever a new post is published, the entire cache is purged, and the visitor needs to re-visit each page individually, or the LiteSpeed Crawler needs to go and index the pages so that there is an available public cache to load the content from.
With ESI, the only cache which really needs to be purged is the sidebar, containing the recent posts. Then, all the visitor needs to do is visit a single page on the site, to regenerate the updated “Recent Posts”.
Definitely, a very nice functionality, which requires extensive testing before complete implementation. Our recommendation is to test it out thoroughly, before activating it for the entire site.
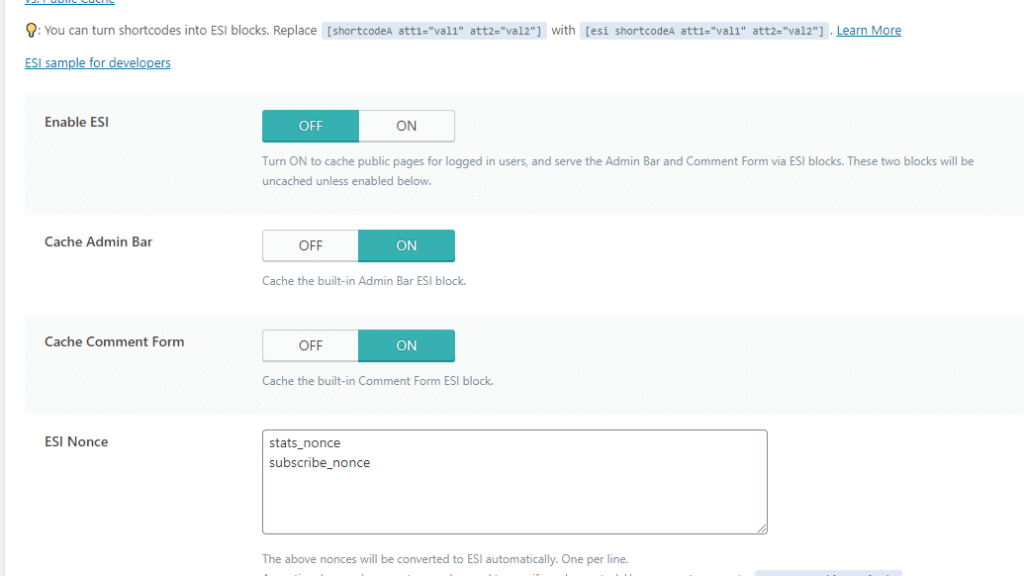
- Enable ESI - Leave the default setting, which is set to “OFF”.
- Cache Admin Bar - Leave the default setting, which is set to “ON”. It makes sense, and it brings no harm to cache the admin bar as an individual ESI block and serves it for the logged-in user directly from the cache.
- Cache Comment Form - Leave the default setting, which is set to “ON”. It makes sense, and it brings no harm to cache comments as individual ESI blocks and serves them for the logged-in user directly from the cache.
- ESI Nonce - This content box may be used to type in specific nonce functions utilized by certain plugins. This will cause them to work seamlessly with either private or public cache, depending on which one you chose during the setup.
- Vary Group - This functionality will allow you to combine user roles with cache varies. In simple terms, you can have publically cached versions of specific pages based on the user’s role. We recommend not using this feature unless you fully understand how it works.
Object Settings
To use object cache, it first needs to be enabled on your account. We at HostArmada have integrated Memcached to provide our clients an object cache option, should they need it. If you want to take advantage of it, please contact our technical support team by submitting a ticket and request Memcached activation for your account. Upon doing so, you will receive the following information:
which you can use to set the object caching in the LiteSpeed Cache plugin. Small sites, with mostly static content and fewer heavy database queries, should not use this option.
- Object Cache - The default setting is “OFF”, and it should remain as such unless you want to use object caching. As mentioned above - this would be a good option for you if you have a big website with lots of dynamic pages and database queries.
- Method - This will allow you to select the object caching service. You have two choices - Memcached or Redis. Both services have their perks and downsides, however, in most cases, Redis will generally pull ahead. However, its integration, especially in Shared Hosting services is harder to implement, thus we have gone with Memcached as it is easier to manage and distribute to our clients.
- Host - In most cases, this will be localhost, as the service is installed on the same server.
- Port - This will be the port for the service - this will typically be a custom port, especially on a shared server.
- Default Object Lifetime - Let this text field use its default 360 seconds value unless the dynamic content on your website is refreshed faster.
- Username - You will not need this setting at all.
- Password - This setting will not be necessary.
- Redis Database ID - If you are hosting your service with HostArmada, this will not be required at all. Generally used for setting different Redis database IDs, which increases performance when dealing with jammed databases.
- Global Groups - This content box allows you to add groups you wish to cache on a network level.
- Persistent Connection - If you are using an object caching type, leave this at its default “ON” status to increase performance. It adds a “Keep-Alive” functionality to the object cache method.
- Cache Wp-Admin - Use this option if you are experiencing a slow backend - otherwise, change it to “OFF”. Slow backend is typically caused by too many plugins, and removing any unnecessary plugins would be more beneficial than utilizing this cache, in our opinion.
- Store Transients - We recommend keeping this Enabled if the above “Cache Wp-Admin” is disabled. Transients are pieces of information stored in the database, which allow plugins to reuse this information and work faster than usual.

Browser Settings
Browser cache was implemented a while back in order to reduce the amount of time larger pages took to load. It enables the browser to store the static content of your website and show them immediately, instead of having to query the server and requested the static content, again and again. The browser is able to load it directly from the cache instead, showing your website much quicker in the process.
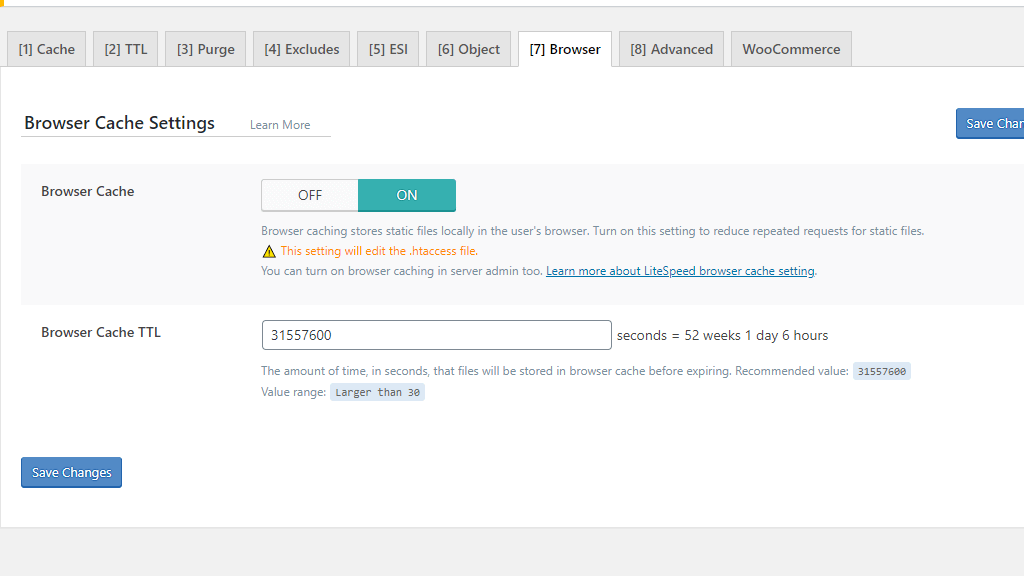
- Browser Cache - If you are hosting your website on HostArmada, this option is enabled on the server level, and it defaults to 7 days. If you enable it from your plugin’s interface, you can use a new time setting in the “Browser Cache TTL” and increase it. We believe that 7 days are more than enough for this cache to refresh, but if you are making changes less frequently on your site, you could increase it to 30 days or even a year.
- Browser Cache TTL - Please use this text field to define the time (in seconds) for the duration of the browser cache.
Advanced Settings
This tab is meant for advanced users only who perfectly understand how caching works and how you can combine multiple caching plugins. We urge you not to touch any settings under this tab unless you are well aware of what you are doing.
- Check Advanced Cache - This option will ONLY be available if LSCache detects that you have a second caching plugin. Please do not install a second caching plugin unless you know how to integrate it perfectly with LSCache.
- Login Cookie - Great option if you have multiple WordPress installations using the same domain name (in a sub-directory). An example of this would be www.wordpreswebsite.com www.wordpresswebsite.com/second-website. In such cases, it is recommended to use a unique login cookie so the plugin can recognize where each visitor is logged in.
- Improve HTTP/HTTPS Compatability - Leaving this setting “OFF” is the preferred choice here. You should never have mixed content to begin with, and if you are facing such an issue, please feel free to reach our Technical Support team over the ticketing system in your Client Area.
- Instant Click - This feature sounds awesome, and it enables links on your website to be opened when the visitor hovers over them. We recommend keeping this setting off, as it can cause troubles, and users may hover over a lot of links, which will make this functionality very tedious. Another downside of this option is the fact that it does increase the server’s load as well due to the increased number of requests.

WooCommerce Settings
This tab will ONLY show up if you have WooCommrce installed, otherwise you won’t see it. ESI could be a good option if you are running a webshop, as an e-commerce environment can greatly benefit from the versatile caching it offers.
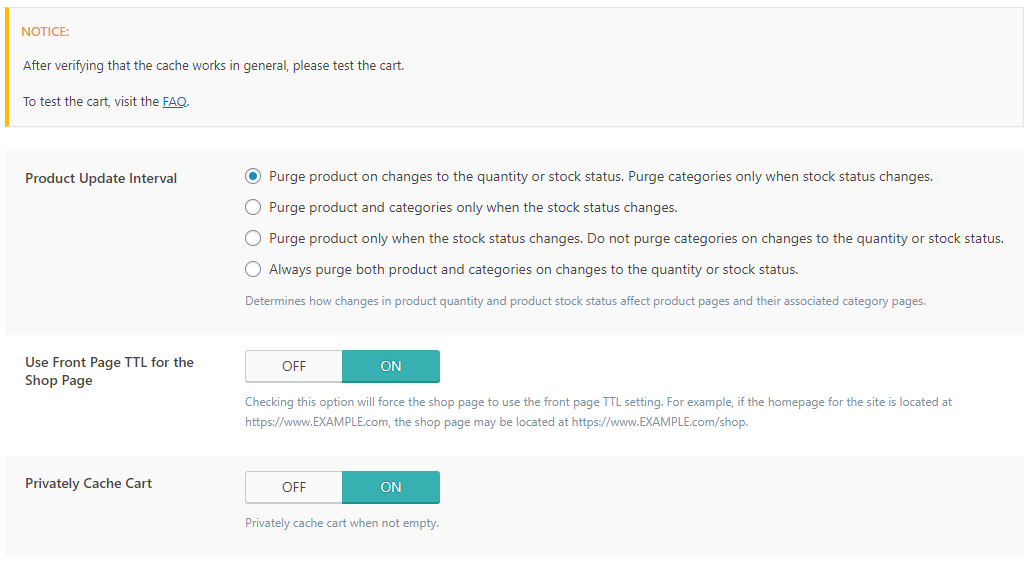
- Product Update Interval - The options under this setting can all be useful, based on the method you use to track your stock status or product quantity:
- Purge product on changes to the quantity or stock status. Purge categories only when stock status changes - Safe and Smart choice if you are tracking the quantities of your products and stock status of your categories.
- Purge product and categories only when the stock status changes - Great choice when you are only tracking the stock status changes. Offers better performance than the previous setting.
- Purge product only when the stock status changes. Do not purge categories on changes to the quantity or stock status - This is the option that provides the best performance. We believe it is the best choice if you do not track quantity changes or stock status.
- Always purge both product and categories on changes to the quantity or stock status - This is the safest option, and it translates into the least amount of performance as a purge will always happen when there is a stock status or quantity change.
- Use FrontPage TTL for the Shop Page - Leave this setting to its default “ON” position.
- Privately Cache Cart - This setting’s default option is “ON”. In our opinion, this is not necessary, as if a buyer starts to put items in their shopping cart, this means he is going to buy from your store. Populating the filled cart in the private cache is something that will not really benefit them that much as buyers will typically not stick around for a long period of time. The extra milliseconds of wait time from the uncached cart will surely not change the buyer’s mind thus, we recommend setting this to “OFF”.
When all the settings under each tab have been set, you need to save them. This is done by clicking one of the “Save Changes” buttons on each of the tabs, which will be located either on the top right corner or on the bottom left side of the page.
There you have it! All the settings under the tabs concerning the “Cache” option in the LiteSpeed Cache plugin. Hopefully, after applying our recommendations, you will see a difference in your website’s speed and scores!

