
LiteSpeed cache is widely available for the majority of OpenSource applications, and WordPress is no exception. There are two methods you can follow to install it. The first one is from the integrated “LiteSpeed Web Cache Manager” in cPanel, and the second one is from the official WordPress plugin repository in your WordPress admin dashboard. In this tutorial, we will review the way of installing it from cPanel while we will explore the other method in a separate tutorial. Let’s get started!
To begin the installation process, you need to log into your cPanel account first. To do that, you may follow the instructions in our How to access the cPanel service tutorial. Once logged in, please navigate to the “Advanced” features group, where you will locate the “LiteSpeed Web Cache Manager” icon.

Once you click on the icon, you will be redirected to the “LiteSpeed Web Cache Manager” interface. On the top, you will see a welcome message, along with a section explaining LiteSpeed Cache's advantages.

Scrolling down, you will see the “Flush LSCache” section, where you will find the “Flush All” button. This is a very useful option when you have a couple of websites, and you want to clear the LiteSpeed plugin cache, without having to enter each individual site’s admin area.

Lastly, we have the “LiteSpeed Cache Management” section. Underneath, you will find the “WordPress Cache” option.

Clicking on it will redirect you to a page, allowing you to perform all sorts of actions with the LiteSpeed Cache, and most importantly - it will allow you to install it for your website!
Once you land on the intended page, you will see a table section in the middle, which will most likely be empty as you are visiting this page for the first time. To populate the table with your WordPress sites, simply click the “Scan” button, located above the table.

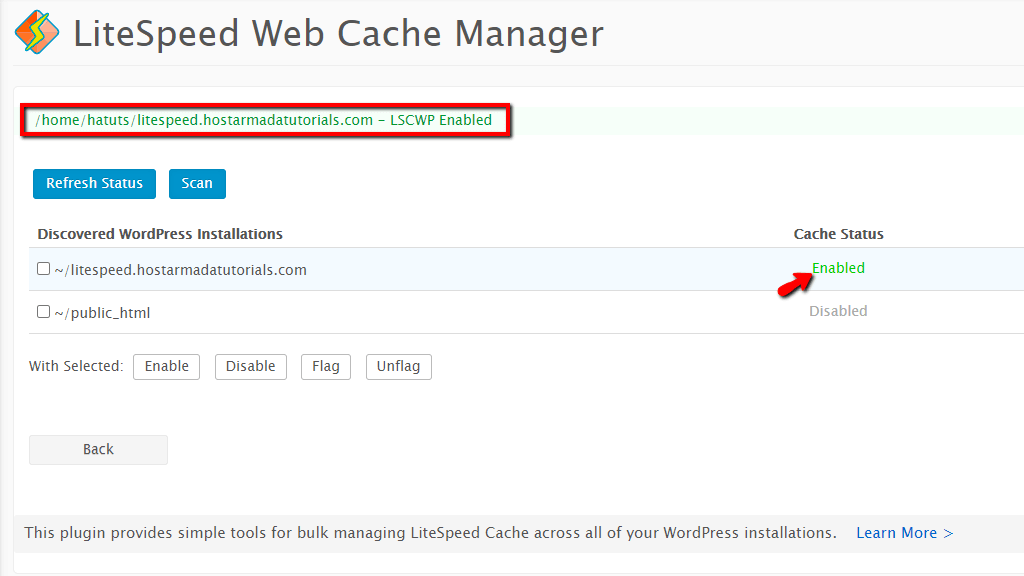
Pressing the “Scan” button will fill the table with all the available WordPress installations on your web hosting account. To install the plugin, simply tick the checkbox corresponding to the site you want to install the plugin for and click on the “Enable” button located underneath the table.

Clicking on the “Enable” button will show a brief loading screen. Afterward, you will see a message indicating the plugin has been activated, along with an “Enabled” status under the “Cache Status” column for the selected site.
With this completed, the plugin is successfully enabled on your WordPress-based website and ready to use.
To start managing your cache options and the plugin’s configuration, please log into your WordPress admin dashboard. To do that, please add “/wp-admin” to your domain name - for example, “mywordpress.com/wp-admin” where “mywordpress.com” is your actual domain. Accessing the mentioned URL will show a login page, where you have to enter your login credentials to access the backend.

Once logged in, please point your attention to the module menu on the left side of the screen. At the bottom of the menu, you will see the “LiteSpeed Cache” functionality integrated into your admin dashboard.

That’s it! You have successfully managed to install LSCache from your cPanel. We hope that the information we provided was thorough enough, and you were able to complete this task on your side. If you are struggling to proceed with the installation or if you faced any technical difficulties, please do not hesitate to contact our Technical Support Team. They are 24/7 available through the ticking system in your Client Area.

Sebahat is a young and bright woman who has become an invaluable part of our team. She started as a Customer Care Representative, mastering that role and, along the way, growing into a tech-savvy individual who is well acquainted with every support layer of the company. Driven by her aim to improve our customers’ experience constantly, she is committed to enhancing the extraordinary support we deliver.
Learn more about Wordpress in the other tutorials that we have: