
Every customer when shopping online is searching for discounts and special promotions. In PrestaShop “Special Promotions” is another meaning of “Cart Rules”. When you want to create a discount voucher you are actually creating a “Cart rule”. If you want to make your customers feel special and with the desire to shop from your Online Store again you should create a discount code for them. In the following lines of this tutorial, you will learn how to fully manage promotional codes for your customers.
In order to be able to set up a special promotion for a specific product of your Online Store, you first have to login into the Admin of PrestaShop. After that in the left vertical navigation menu look for the “Catalog” option. When you find it, please, click on it.
A drop-down menu will appear with the following options:

Out of all these, please, click the “Discounts” option.
After you click the “Discounts” option you will be redirected to a page called “Cart Rules”.
By default, there will be no predefined discounts on the “Cart Rules” page.
To add a new Cart rule please click the “Add new cart rule” button at the very top right of the page.

Once you click the “Add new cart rule” button a new section will load on the page.
You will see that the section is divided into three tabs - “Information”, “Conditions” and “Actions”. All these three tabs contain fields that need to be filled for proper cart rule creation.

Let’s start off with the first tab - “Information”.
The first field is called “Name”. The name resembles the cart rule and is visible for the customers.

After the name of the cart rule, you will find the “Description” field. The description is only visible for you and it helps you understand the specific cart rule better. For example, if you have set a few similar cart rules you might start mixing what each one is used for. Thanks to the description field, you can easily differentiate those.

Next you will find the “Code” field. The code is the actual promo code for the specific cart rule. This is what the customer will use when necessary as a promo code on the checkout page of your Online Store. Please, bear in mind, that if you decide to leave the field blank, the cart rule will be available for every customer.

The next field is the “Highlight” field. This option is useful when you would like to inform the customer for available coupon codes or vouchers for items in their shopping cart. For example when the user is shopping for products that are not discounted and when no other coupon code is used, Prestashop will automatically present the customer with any available coupon code so the user can take benefit from the offered discount!

The “Partial Use” option is the next one. Sometimes the promotion voucher can be the same as the total amount of the order, or be bigger than that. In these cases is good if you set the “Partial Use” option to “Yes” because this way you are allowing the difference in the total price and the voucher to be added as a new voucher to the customer’s account. If on the other hand, you decide to disable it, then the voucher will only be used once, no matter if it is completely used or not.

When you have multiple vouchers it is recommended to set an order for them. The “Priority” feature is the tool that will help you set the vouchers in order. Priority. Let’s say that a customer is eligible for more than one voucher, with the “Priority” tool you can apply the vouchers one by one in alphanumerical order. The lower number written in the field means higher priority and opposite.

The last field in the “Information” tab is called “Status”. This option basically enables or disables the usage of this particular Promo code.

After you are done setting the features in the “Information” tab, please, click the “Save and Stay” button. That action will save all your changes but will keep you on the current page.

Now, it is time to move to the second tab, so, please, click the “Conditions” tab.
In the “Conditions” tab you are able to choose precisely who should be able to benefit from the cart rule. The fields that you have to fill in the “Conditions” section are as follow:
“Limit to a single customer” - Here you indicate if you want only one customer to use the voucher that you are creating. Let’s say the delivery got delayed and as a gesture of goodwill, you create a voucher that is specifically for that customer in order to compensate him/her. To be able to create the voucher for that person, please, enter the first few letters of their first name, last name or email in the “Limit to a single customer” field. Please, bear in mind, that if you leave it empty that will show PrestaShop that any customer can use it.

“Valid” - by default, the validity is set to one month. You can always change the default validity to one week or even one day.

“Minimum amount” - In this field, you can indicate what you want the minimum amount of the order to be for the voucher to be applicable. The voucher will be activated only once the order cost is above the given amount. Prestashop also provides you with the option to choose if you want the taxes and/or shipping costs to be included as well.

“Total available” - This field is for the total amount of times when the voucher will be used.

“Total available for each user” - You are provided with an option to set how many times each customer can use the voucher.
Please, bear in mind, that if you decide to set the “Total available for each user” field to “1” value then Prestashop will allow each customer to use the voucher only once. The amount you enter in the “Total available for each user” field has to be at least equal to the quantity of available vouchers above (look the “Total available” field).
For example, if in the field “Total available” you had entered 7, then that means 7 vouchers will be available, but in the field “Total available for each user” you typed 5, then that means the customer will only be able to use 5 out of those 7 available vouchers.

The next option is shown as checkboxes. That part of the section is called “Restrictions” and is very important because you can filter to what or to whom the rule is going to be applied.
When you mark the “Carrier selection” checkbox, a submenu will appear.
The submenu will be divided into two sections: “Unselected carriers” - this is from where you can add more carriers to the “Selected carriers” section which is where all the already selected carriers will be positioned. Please, bear in mind, that by selecting a specific carrier, then the voucher will be available only for the selected carriers.

Next is the “Customer group selection”.
If you mark the “Customer group selection” a submenu appear as well. The only difference with the submenu for the “Carrier selection” is that here are the different groups of users. Thanks to this tool, you are able to create discounts that can apply only to certain groups of customers.
If you have more than one cart rule, then another option appears - “Compatibility with other cart rules”. Thanks to this option you can tell PrestaShop that the rule you are creating now can not be combined with a selection of other rules.

Last, but not least in that section is the “Product selection” checkbox.
Thanks to that tool you can create an automatic voucher for a cart with specific products. When you mark it a button called “Product selection” will appear.

When you click it the following options appear:
Once you click the “Product selection” button, two more options will appear.
The first option is called “Number of products required in the cart to enjoy the discount:”.
The second option is called “Add a rule concerning”. You have to add at least one rule, of the type you want, for example, products, attributes, categories, brands or suppliers. There is no limitation on how many rules per product to be added.

Once ready with the fields in that section, please, click the “Save and stay” button at the bottom of the page.

The last tab is called “Actions”. The “Actions” tab is where you choose what the discount is about.
The first option that you will see is called “Free shipping”.
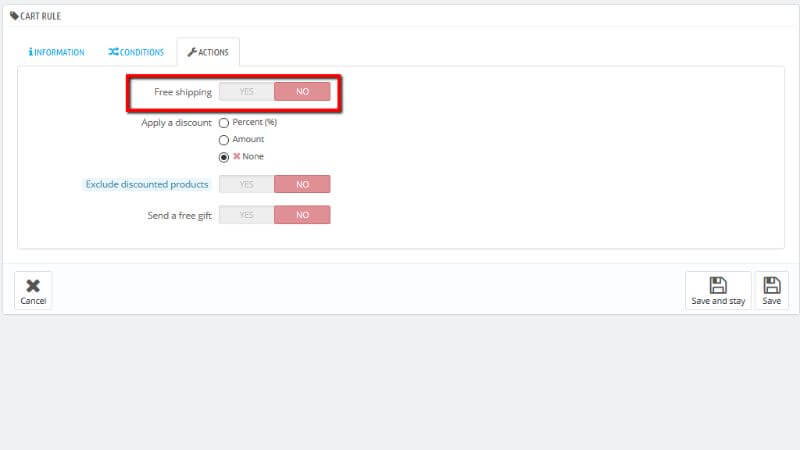
Next, you will see the “Apply a discount” option.
You have two choices. You can either apply a discount with percentage value or choosing the discount to be in a specific amount.
If you mark the “Percent (%)” option then the rule you are creating will apply to a percentage of the total order. For example, the order has a total amount of $100 before taxes. You had set the rule to have a value of 10%. Then that means out of these $100 the customer will only have to pay $90 before taxes and shipping.

If on the other hand, you choose to set the “Amount” for a discount, then a specific amount will be deducted from the total order.
If the total order before taxes is $200 and you have set a rule off discount for $25, then the customer will pay only $175 before the taxes and shipping. You are also provided with an option of whether to choose if taxes will be applied to the discount or not.

There is one more option in the “Apply a discount” section. It is called “None”.
Choosing that option you specify that the certain rule does not offer any discount on the order. Please, bear in mind, that if you choose that option then the next option in the “Actions” tab disappears.

If “Percent (%)” or “Amount” options are selected, then you will see another option called “Apply a discount to”.
The “Apply a discount to” option contains few values. They are as follow:


By default, the cart rule applies to all kinds of products, no matter if they are already discounted or not. In the “Actions” tab there is a feature that you can enable in order for the discount to not apply to products that are already on sale. That tool is called “Exclude discounted products”.

If you want to just send a free gift instead of the discount you can use the last option in the “Actions” tab.
It is called “Send a free gift” option. Once you click that feature a field appears. There you have to type the first letter of the product and choose from the list of the matching names.

Once everything is set, please, click the “Save” button at the bottom of the tab.

Once your voucher is saved you will see a “Successful creation” sign.

Now, since you had created a voucher you can either send it yourself to your customers or let the system handle it automatically.
Congratulations! Today you learned what is a special promotion and how to set it up so that your customers can benefit and return to your Online Store.

Sebahat is a young and bright woman who has become an invaluable part of our team. She started as a Customer Care Representative, mastering that role and, along the way, growing into a tech-savvy individual who is well acquainted with every support layer of the company. Driven by her aim to improve our customers’ experience constantly, she is committed to enhancing the extraordinary support we deliver.
Learn more about Prestashop 1.7 in the other tutorials that we have: