
You could not disagree that a fresh new WordPress installation looks quite plain. Soon enough you would want to change that. Creating pages is one of the essentials when it comes to the customization of your WordPress website. Your pages represent you, your brand, ideas, and goals.
Before we step into the actual process of creating a new page, we would like to point out a few important details. You need to understand what is the main difference between posts and pages so that you can develop your website in the most efficient way.
In WordPress, like in many other blogging applications, posts are intended for content that tends to change, whereas pages are designed for static content, such as company information, business philosophy, or "About Us" page - to name a few.
In the following lines, we will explore the flexibility WordPress grants you in terms of creating your website pages. You will find comprehensive instructions on each small step you need to take while you are developing a page in order to obtain the desired result.
For a start, we need you to log into your WordPress Admin Dashboard by accessing your domain followed by "/wp-admin", i.e., "yourdomain.com/wp-admin", where "yourdomain.com" stands for your own domain name.
Once logged, please hover over the "Pages" item in the left-hand side navigation menu. A submenu containing the following options will appear:
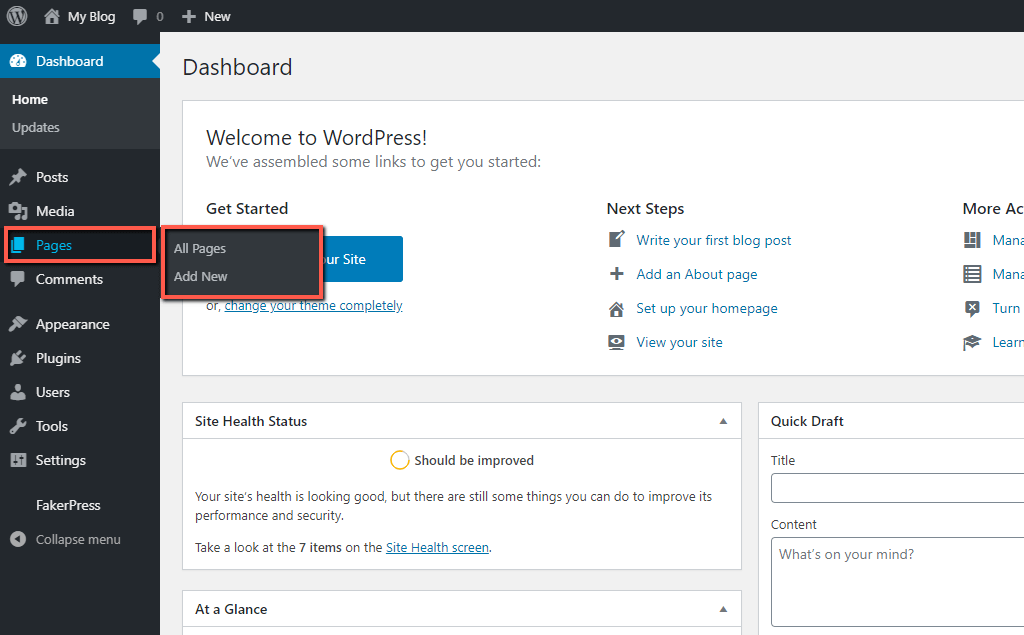
Please click on the “Add New” option. Upon doing that, you will be transferred to the page configuration interface. If you have previously created posts, you will notice it is quite similar, and you will already be familiar with most of the settings.
Please note that in our tutorial, we will be using the old "Classis Editor" in WordPress. If you want to switch from the new "Block Editor", also know as "Gutenberg", please refer to our tutorial on How to switch from Block Editor (Gutenberg) to Classic Editor in WordPress.
Let's first start with the Page Title and Content.
The first "Add title" field is intended for your page title. The title appears as the main heading of the page when it is published. It will also represent the page in navigation menus if it is assigned to such. Find a suitable one for your page, because that is the main thing that captures peoples’ attention.
Once the post title is specified, WordPress will automatically generate the page URL address based on it. You can see it displayed right beneath the title field. By clicking on the "Edit" button, you will be able to change the slug of the page URL, i.e., "/my-first-post". If you are planning on customizing it, please make sure to use only lower-case letters and replace all spaces with dashes (-).
The WYSIWYG editor below is intended for the actual page content. As you can see, it includes many useful tools you can take advantage of to customize your text.

We will review them in detail in the following section.
Once you add the page title and the desired content, you will probably want to format it in order to achieve the desired result. As you can see, the editor includes all start tools, which you are probably already familiar with. They allow you to customize the following aspects:
If you click on the "Toolbar Toggle" icon (the last icon on the first row), an additional set of tools will be displayed, allowing you even more flexibility. You will find tools enabling you to:
You will also notice two editor modes. They allow you to select the most convenient way of entering your post content.

In that field, you can maneuver with what exactly you want to add to the page of your website.
We all know that not the text, but pictures or videos are catching visitors' attention. To make your page more engaging for people, you will most definitely want to add media to it.
To do so, please click on the "Add Media" button.

Upon doing that, a new dialog appears presenting the "Media Library", which includes all images available in your WordPress gallery. In case you want to upload a new image, please switch to the "Upload Files" tab and click on the "Select Files" button to choose the desired files from your local computer or directly drag and drop them into the empty area. The "Insert from URL" option allows you to provide an image source URL address, in case you want to load it from another source.
As soon as the image is uploaded or selected, you will be able to configure its settings in the right "Attachment Details" section. You can specify an "Alt text," which is going to be displayed in case the image cannot be loaded for some reason, "Title", "Caption", and "Description". You are able to align the image as desired, link it to other content, and determine whether to be displayed in full size or used as a thumbnail.
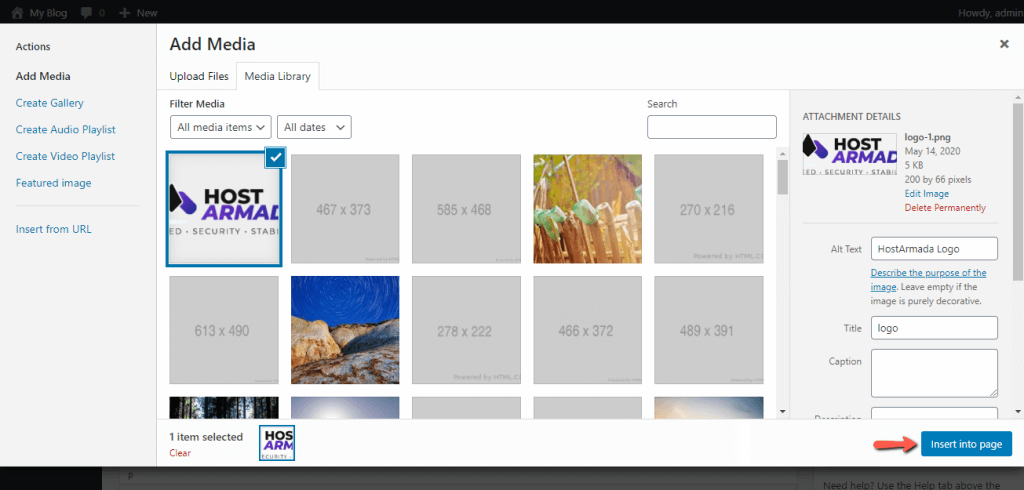
When you perform the required changes, please click on the "Insert into page" button.
There are a few additional settings you have to configure, and you will be ready to publish the page. You can see two "Page Attributes" and "Featured image" blocks in the right end on the page.
Within the "Page Attributes" block, you can edit the following settings:
From the "Featured image" block, you can set the image which is going to be used as a thumbnail image for the page. This image will appear in various places throughout your website. For example, when the page is assigned to a menu.

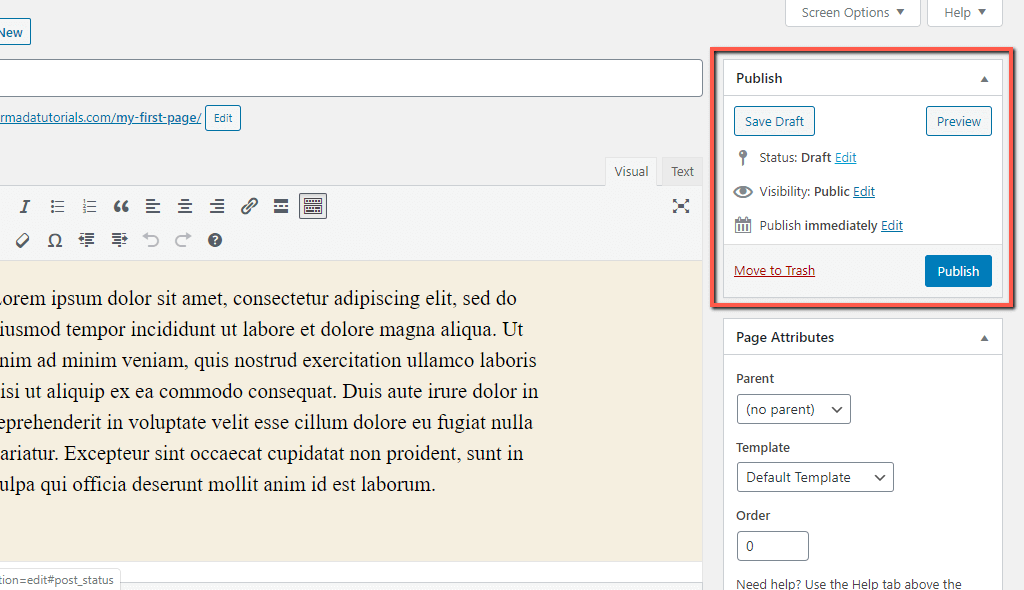
Finally, you are ready to publish your brand new page.
You will find the "Publish" section in the top right corner of the page. That is the section where you can finalize adding your page. You can also see how your page will be looking once you are done with it, or you can save it for later edits. Once you hover over that menu, you will see the options:
With this done, your new page is successfully completed.
Congratulations! You just learned how to create new pages on your WordPress website. Now know the fundamentals of customizing your site, and you are ready to share any desired information with your visitors. We sincerely hope our instructions were clear enough for you to catch up with, and we would like to encourage you to review the rest of our tutorial series based on WordPress.

Sebahat is a young and bright woman who has become an invaluable part of our team. She started as a Customer Care Representative, mastering that role and, along the way, growing into a tech-savvy individual who is well acquainted with every support layer of the company. Driven by her aim to improve our customers’ experience constantly, she is committed to enhancing the extraordinary support we deliver.
Learn more about Wordpress in the other tutorials that we have: