
In the context of blogging or labeling web items, Tags are often used when you would like to unite multiple web items like products, blog posts, articles, etc around a certain subject or a common descriptive word. As you might have guessed already such is the case with the Blog Categories functionality, and in parts you are correct. Think of the tags as an easy way to unite blog posts under one common characteristic described with one or a few words separately from the categories. In the following lines of this tutorial, we will show you how easy it is to fully manage the Tags of your blog posts in the HostArmada Website builder.
In order to assign new tags to an existing blog post, you will first have to edit the blog post. You can achieve that by accessing the list of existing Blog Posts using the left vertical menu and then by clicking on the small pen-like icon next to the blog post you would like to edit.

This action will redirect you to the standard Blog Post editing page. From the top horizontal toolbar, please choose the icon for additional options, and from the newly displayed drop-down menu, please choose the "Tags" option.
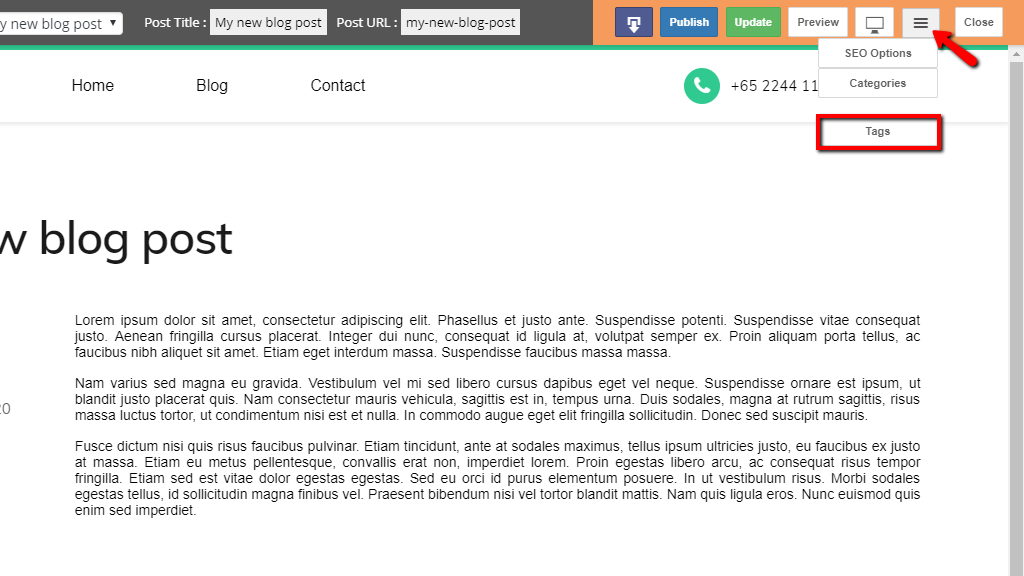
Then you will be presented with a new dialog box in which you will be able to add new tags to the selected Blog Post. You should notice that there will be a single text field in which you will be typing the tags you would like this blog post to relate to. Please bear in mind that you can type multiple tags in this field by separating those with coma - ",". Once you are ready filling the tags, you should click on the "Add" button positioned right next to the field where you have added the tags.

When the tags are added they will be listed right below the field you have just used to add those. Finally, please click on the "Save" button located at the bottom of the dialog box so your tags can be saved. When this is done the Website Builder will prompt you with a message indicating the tags were added.
Apart from the Tags being associated with the selected Blog Post, those will be also created as separate entities in the structure of the Website Builder which you will be able to delete and edit. We will cover these actions in the next paragraphs to come.
To complete the process of saving and publishing the changes you have just made to your Blog Post, please click on the "Update" and then "Publish" buttons located in the top horizontal toolbar.

This finalizes the process of adding tags to your Blog Posts. In case you face any difficulties performing the outlined procedure, please do not hesitate to contact us.
As we have mentioned the Tags you are adding are created as separate entities in the HostArmada Website Builder. As such, they can be edited and even deleted separately from the Blog Posts they have been added. Please bear in mind that editing or deleting a tag will reflect on all Blog Posts you have associated the Tag with. For example, if you change the name of the tag, it will be automatically changed across all of the Blog Posts you have added the tag to. Respectively, if you delete a tag it will be removed from all the blog posts that you have added the tag to.
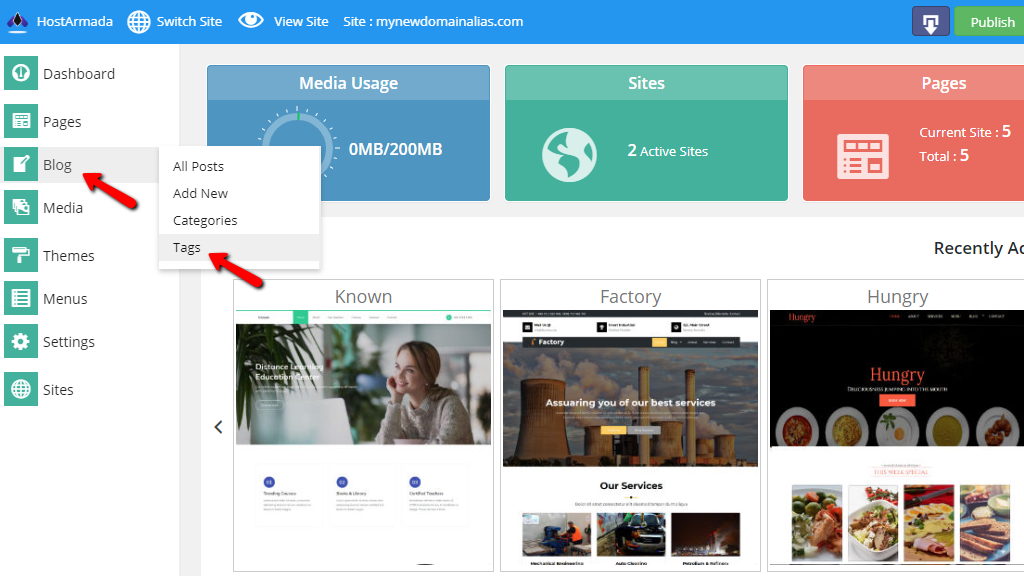
Before we can show you how to edit or delete an existing tag, let's access the complete list of tags you have created for your Blog Posts. To do that, please hover over the "Blog" menu item located in the left vertical menu of the HostArmada Website Builder. A drop-down menu will appear right next to it and out of all the displayed options please click on the last one - "Tags".
You will be redirected to a new page on which all of the tags will be listed as a conveniently structured table view.
To Edit a tag, please click on the small pencil-like icon next to the tag you would like to edit.

This action will redirect you to a brand new page called "Edit Tag" on which you will be presented with all the options you can edit for the chosen tag.
Finally, in order to save the performed modifications, please click on the "Update" button displayed at the bottom of the page.

When your changes are saved, the Website Builder will display an appropriate message at the top of the page.
Please bear in mind that if you are adding the tags directly from your Blog Posts, as we have explained initially in this tutorial, those will be created without description. Also, the URL for each tag will be automatically configured to be the same as the name of the tag. Therefore, we strongly advise that each tag is created from a single word or if from multiple to use the dash ("-") as a separator instead of spaces.
To Delete an existing tag, please return to the list of tags and for the tag, you would like to delete, please click on the small trashcan-like icon.

You will be then prompted to confirm the deletion of the selected tag and after you do so the tag will be removed.
That is all you will ever need in order to properly manage the Blog Tags of your website built with the HostArmada Website Builder. As you can see, the procedures outlined in this tutorial aim to provide you with general insight and easy-to-follow steps in order to achieve your goal. Still, if you are facing any difficulties, please do not hesitate to contact our Technical Support Crew so they can assist you with any issues you might be experiencing.

Sebahat is a young and bright woman who has become an invaluable part of our team. She started as a Customer Care Representative, mastering that role and, along the way, growing into a tech-savvy individual who is well acquainted with every support layer of the company. Driven by her aim to improve our customers’ experience constantly, she is committed to enhancing the extraordinary support we deliver.
Learn more about Website Builder in the other tutorials that we have: