
What is better than easily creating a website without programming or designing knowledge - being able to create multiple websites using the very same convenient and easy-to-use website builder. In the following lines of this tutorial, we will show you how to create new or manage already existing websites with the HostArmada Website Builder. Let's begin!
This tutorial assumes that you have created at least one website in the HostArmada Website Builder. If you have not done so already, please check our other tutorial "How to start a new website with HostArmada Website Builder".
As we have mentioned with HostArmada Website Builder you can manage multiple websites. This means that each website can be on a different domain or a subdomain. To achieve that you will need to first ensure that the desired domain/subdomain is already added to your cPanel account. Here are two additional tutorials to help you out when managing your domains in cPanel:
Please note that you cannot manage websites for Domain Aliases.
To add a new website into the HostArmada Website Builder you will need to hover over the "Sites" menu. From the newly displayed sub-menu please click on the "Add New" link.

You will then be redirected to a brand new page in which you will need to configure your new website. The configuration options are as follows:
When you are done configuring the required information, please click on the "Add Site" button located at the bottom of the page.

Once the website has been added the Website Builder will prompt you with a message of success and also with two useful links which you can use in order to "Visit Dashboard" or "Edit Site".

Clicking on the "Visit Dashboard" will take you to the Dashboard for your brand new website where you will need to start with it by choosing a theme. We have described the process in our tutorial "How to start a new website with HostArmada Website Builder". By following the described procedure you can add as many new websites as you would need and for each, you will be able to manage different themes and content of course.
Apart from adding a new website, the HostArmada Website Builder also provides you with the option to clone an already existing website. Typically the reason why you might want to clone an existing website is that if you would like to have the same design as the original one but with different content like pages, posts, and so on.
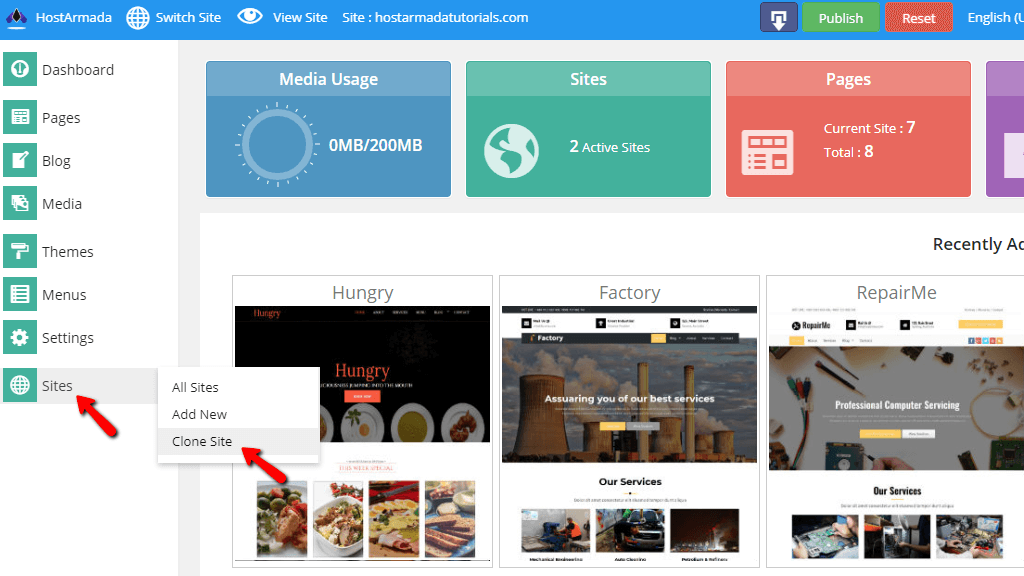
To clone an existing website you will need to hover over the "Sites" menu and from the newly displayed sub-menu to click on the "Clone Site" link.
You will be redirected to a new page on which you will have to configure the following options:
Once you are done configuring the options please click on the "Clone" button located at the bottom of the options section.

When the cloning process is completed you will be presented once again with a message indicating that the new website has been added and of course the usual links for "Visit Dashboard" and "Edit Site".

With that, the process of cloning the website is completed. Your new website will be available for edits if you click on the "Visit Dashboard" link.
When you no longer need a certain website the HostArmada Website Builder gives you the option to completely remove it. To do that first you will have to list all the websites that you have added to the Builder, so please click on the "Site" link from the main vertical navigation menu.

You will be redirected to a new page where a complete list of all the websites will be presented. To delete a website you will need to click on the red trashcan icon for the concrete website.
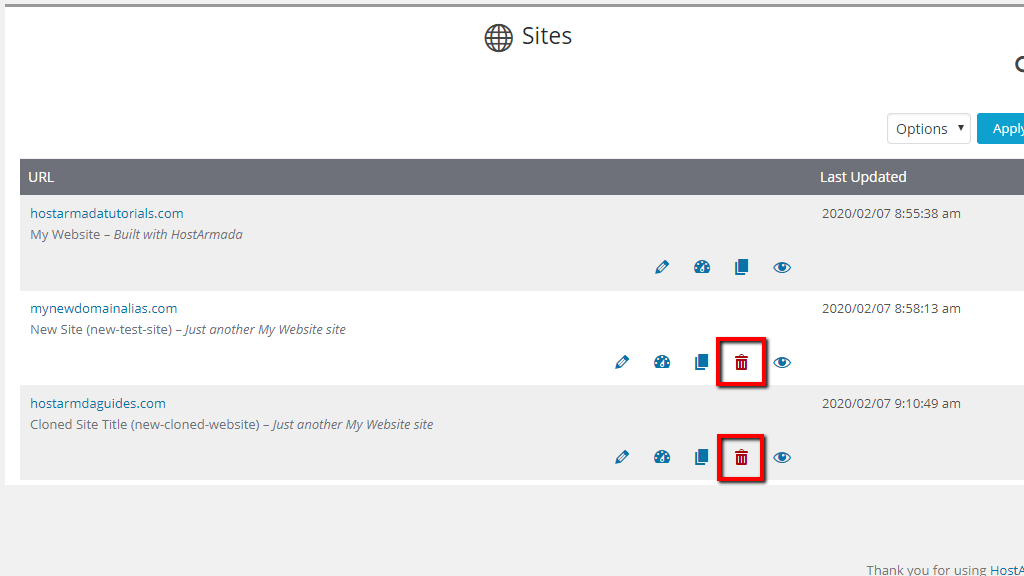
Please note that you cannot delete the website for the primary domain of your account as it is the default one and without it, the Builder will not work. Once you click on the trashcan icon you will be prompted to confirm the deletion and once you click the "Confirm" button your website will be deleted.
Congratulations! You are now fully aware of how to manage the websites built with the HostArmada Website Builder. In case you are facing any difficulties with the described procedures, please let us know by submitting a ticket to our Technical Support Crew as they will be able to assist you with any Website Builder-related issues.

Sebahat is a young and bright woman who has become an invaluable part of our team. She started as a Customer Care Representative, mastering that role and, along the way, growing into a tech-savvy individual who is well acquainted with every support layer of the company. Driven by her aim to improve our customers’ experience constantly, she is committed to enhancing the extraordinary support we deliver.
Learn more about Website Builder in the other tutorials that we have: